


SimBooth Kit 2 - 4K
Got Questions?
Email: support@simulatordirect.com
Phone: (714) 202-9416
Choose options
- Description
- Product Features
- What's Included
- Product Specifications
- Getting Started Guide
- Product Installation Guide
- Brochures
- Videos
- Product Manual and User Guides
- Technical Drawings
- YouTube Reviews
- FAQ's
- Shipping/Returns & Warranty Policy
SimBooth Kit 2 - 4K
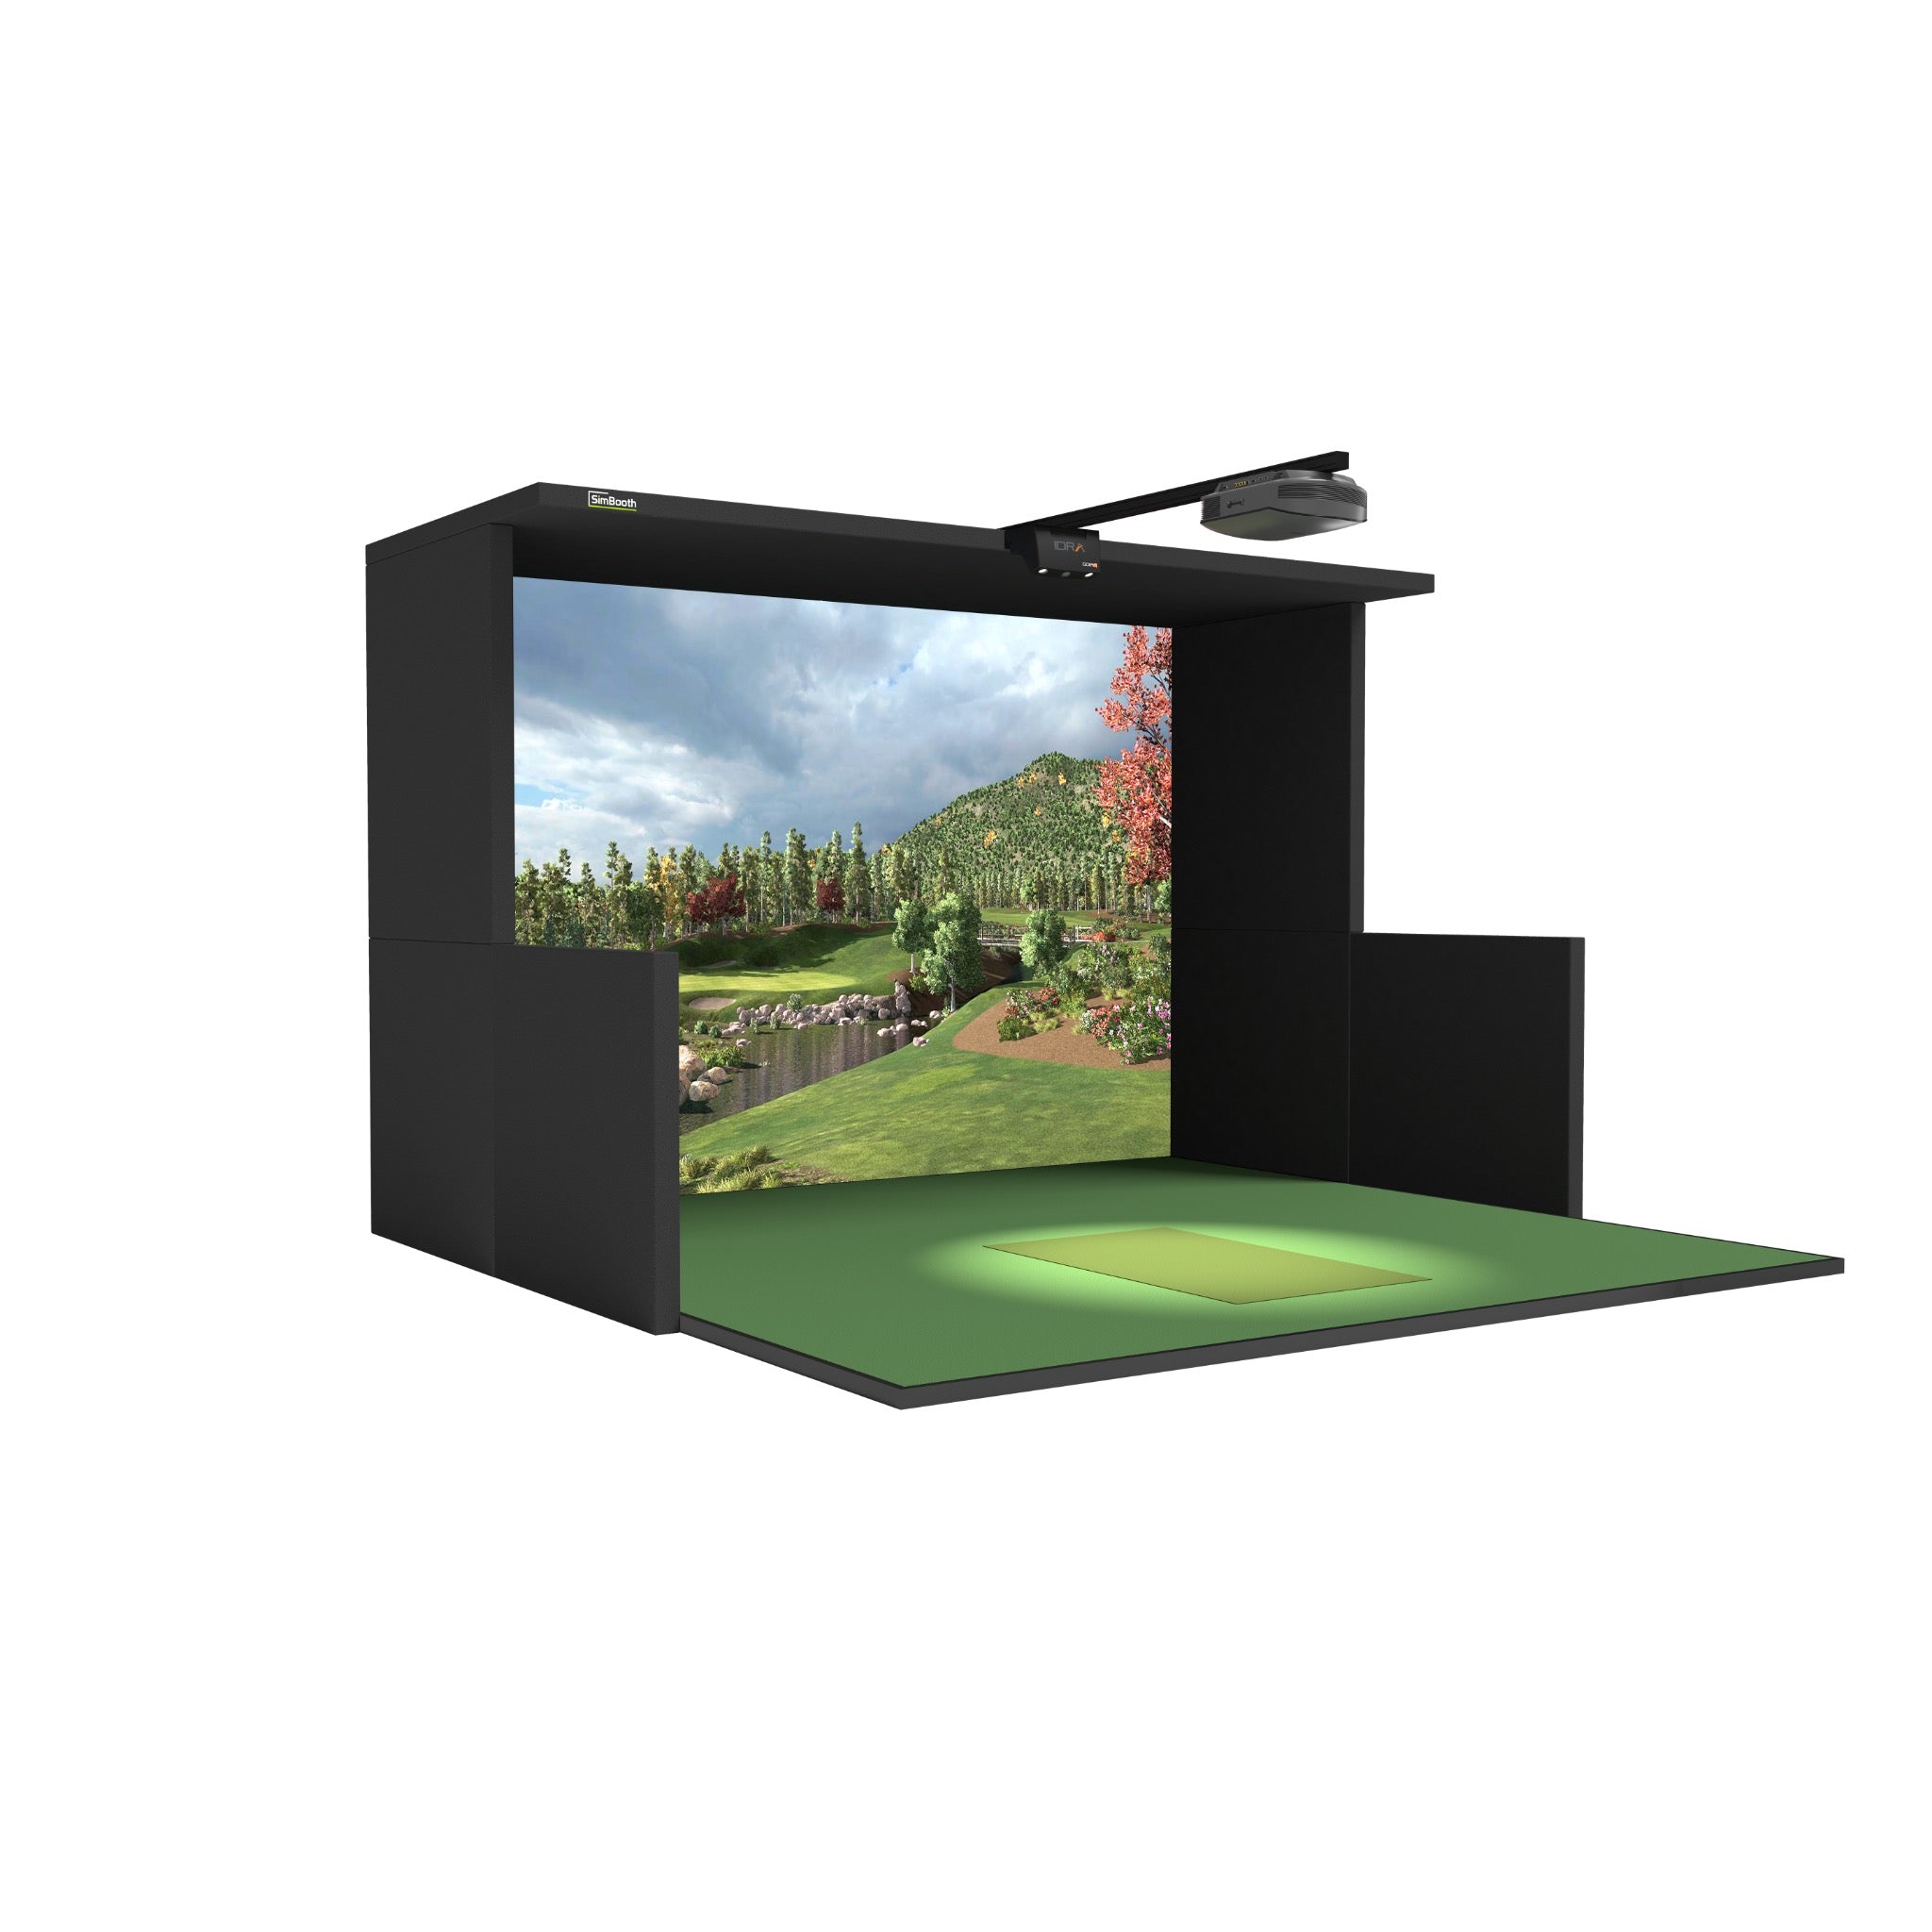
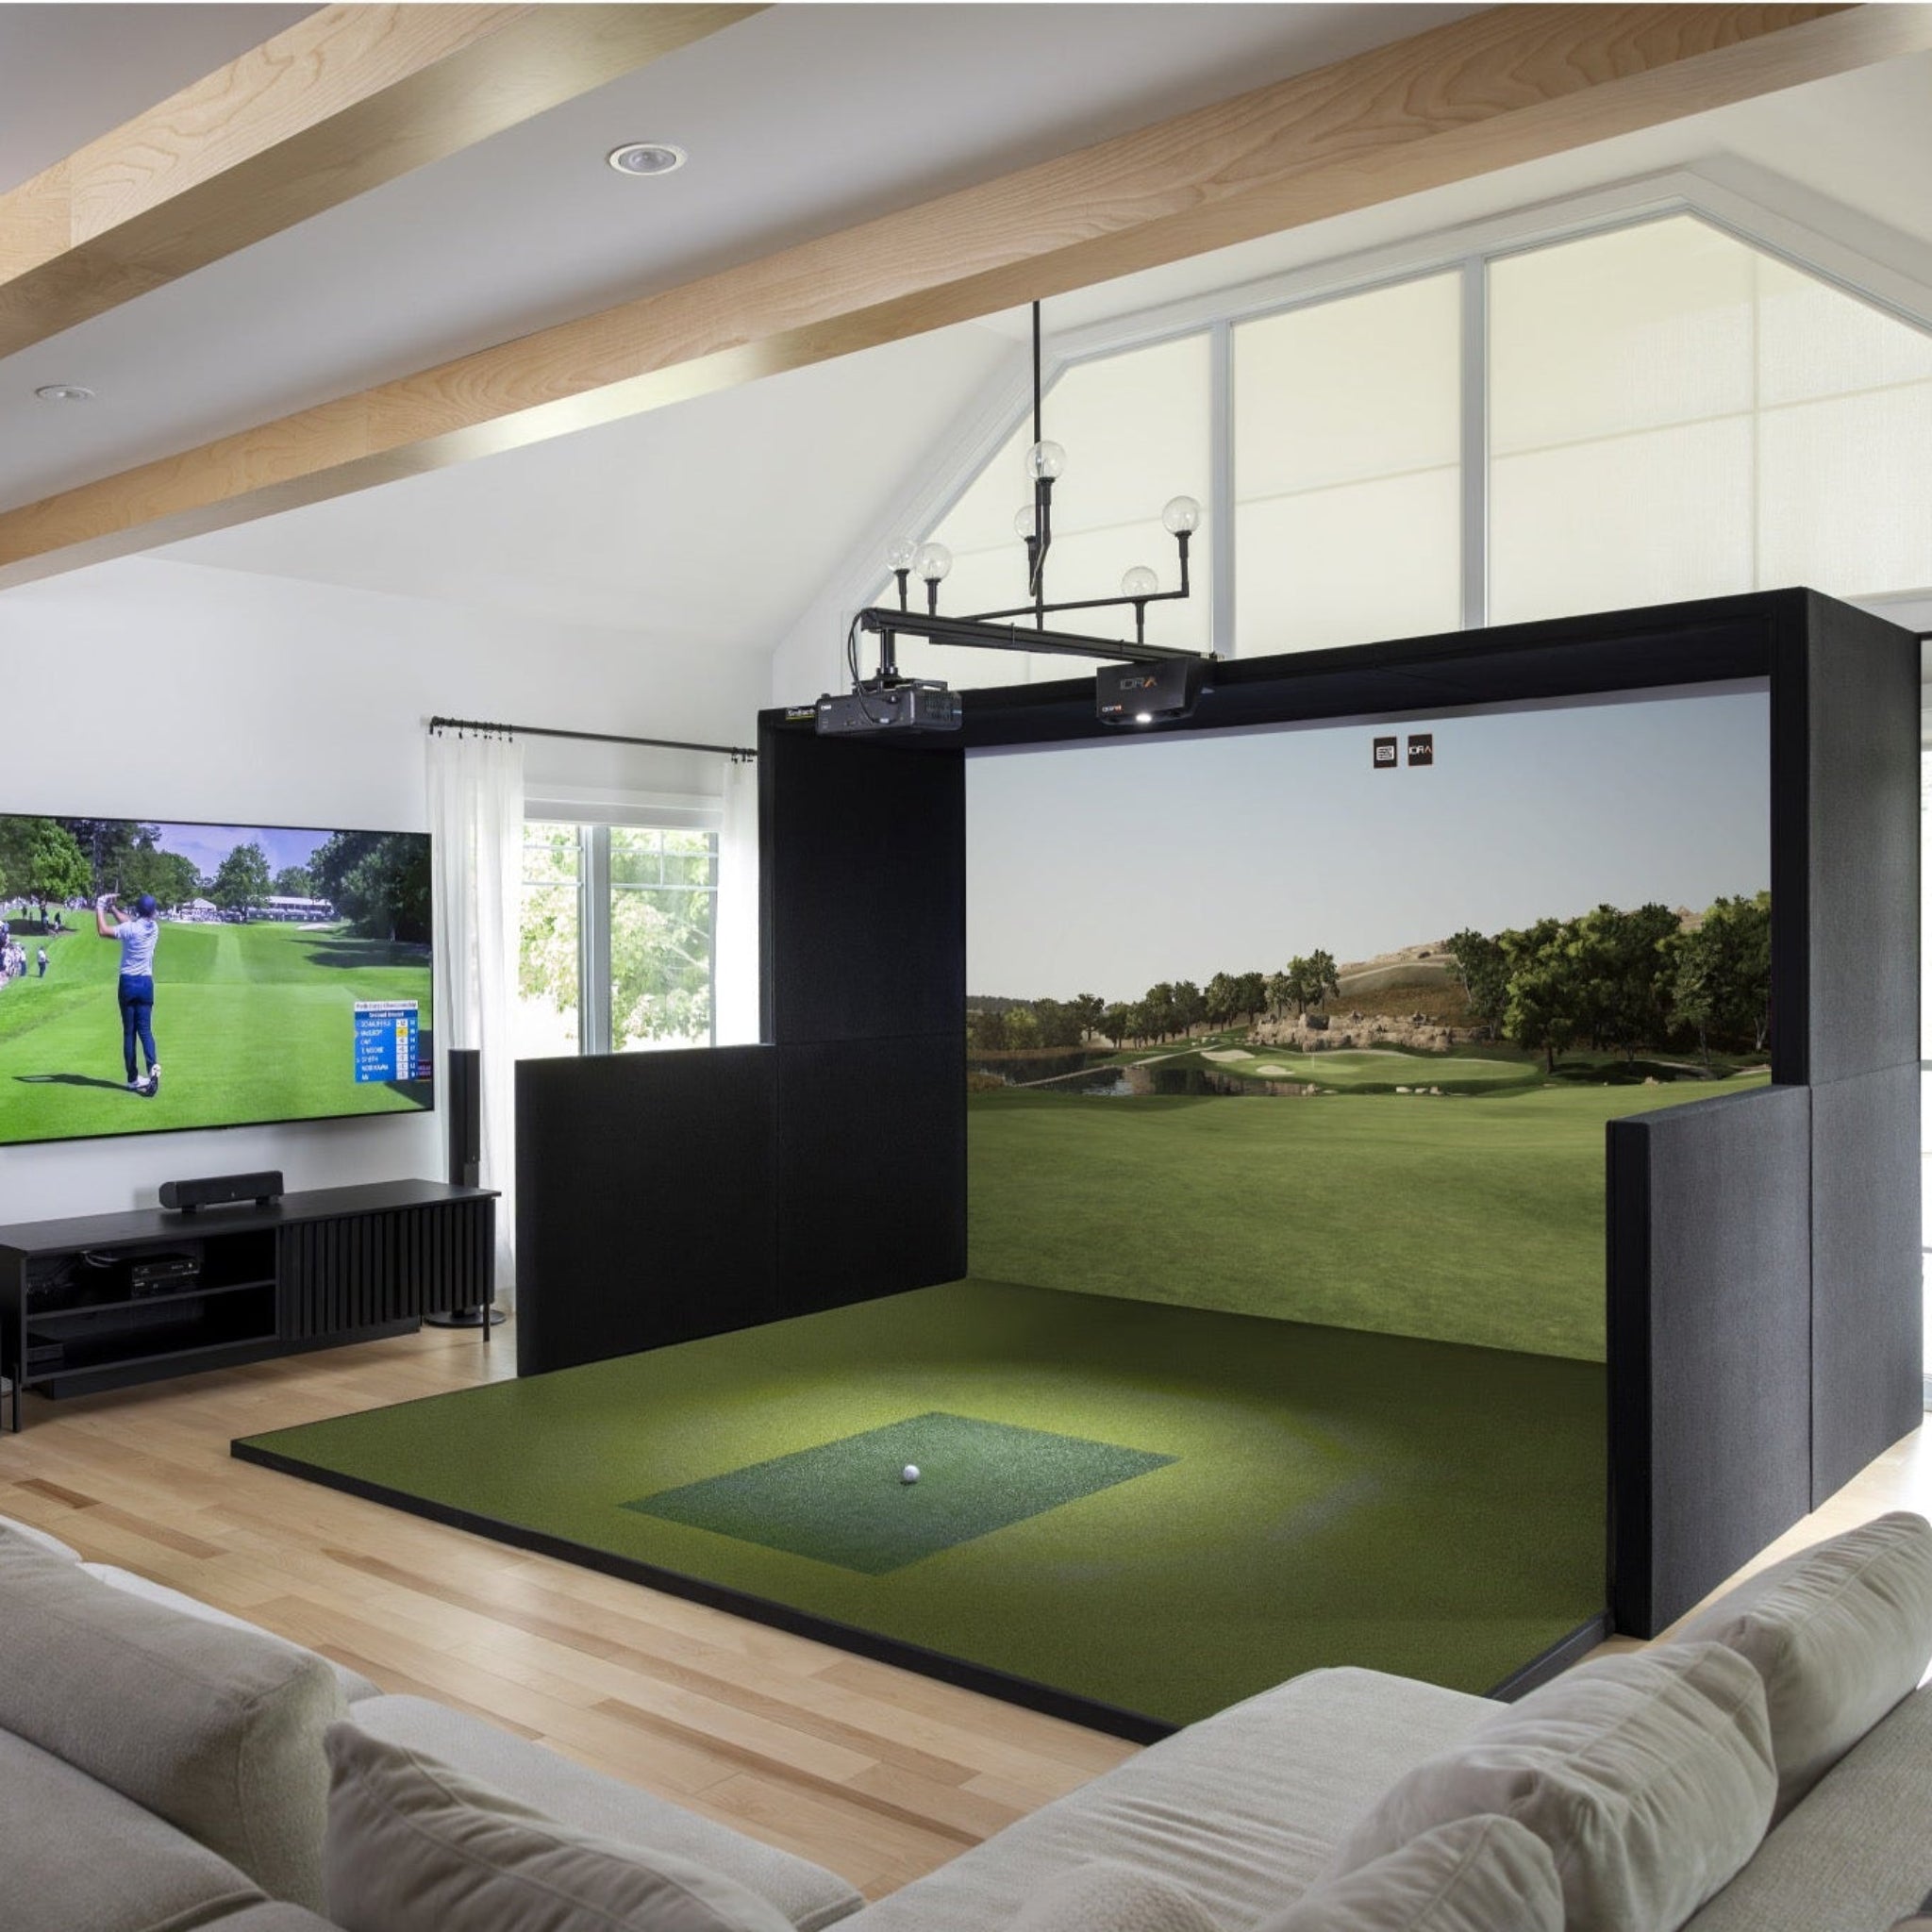
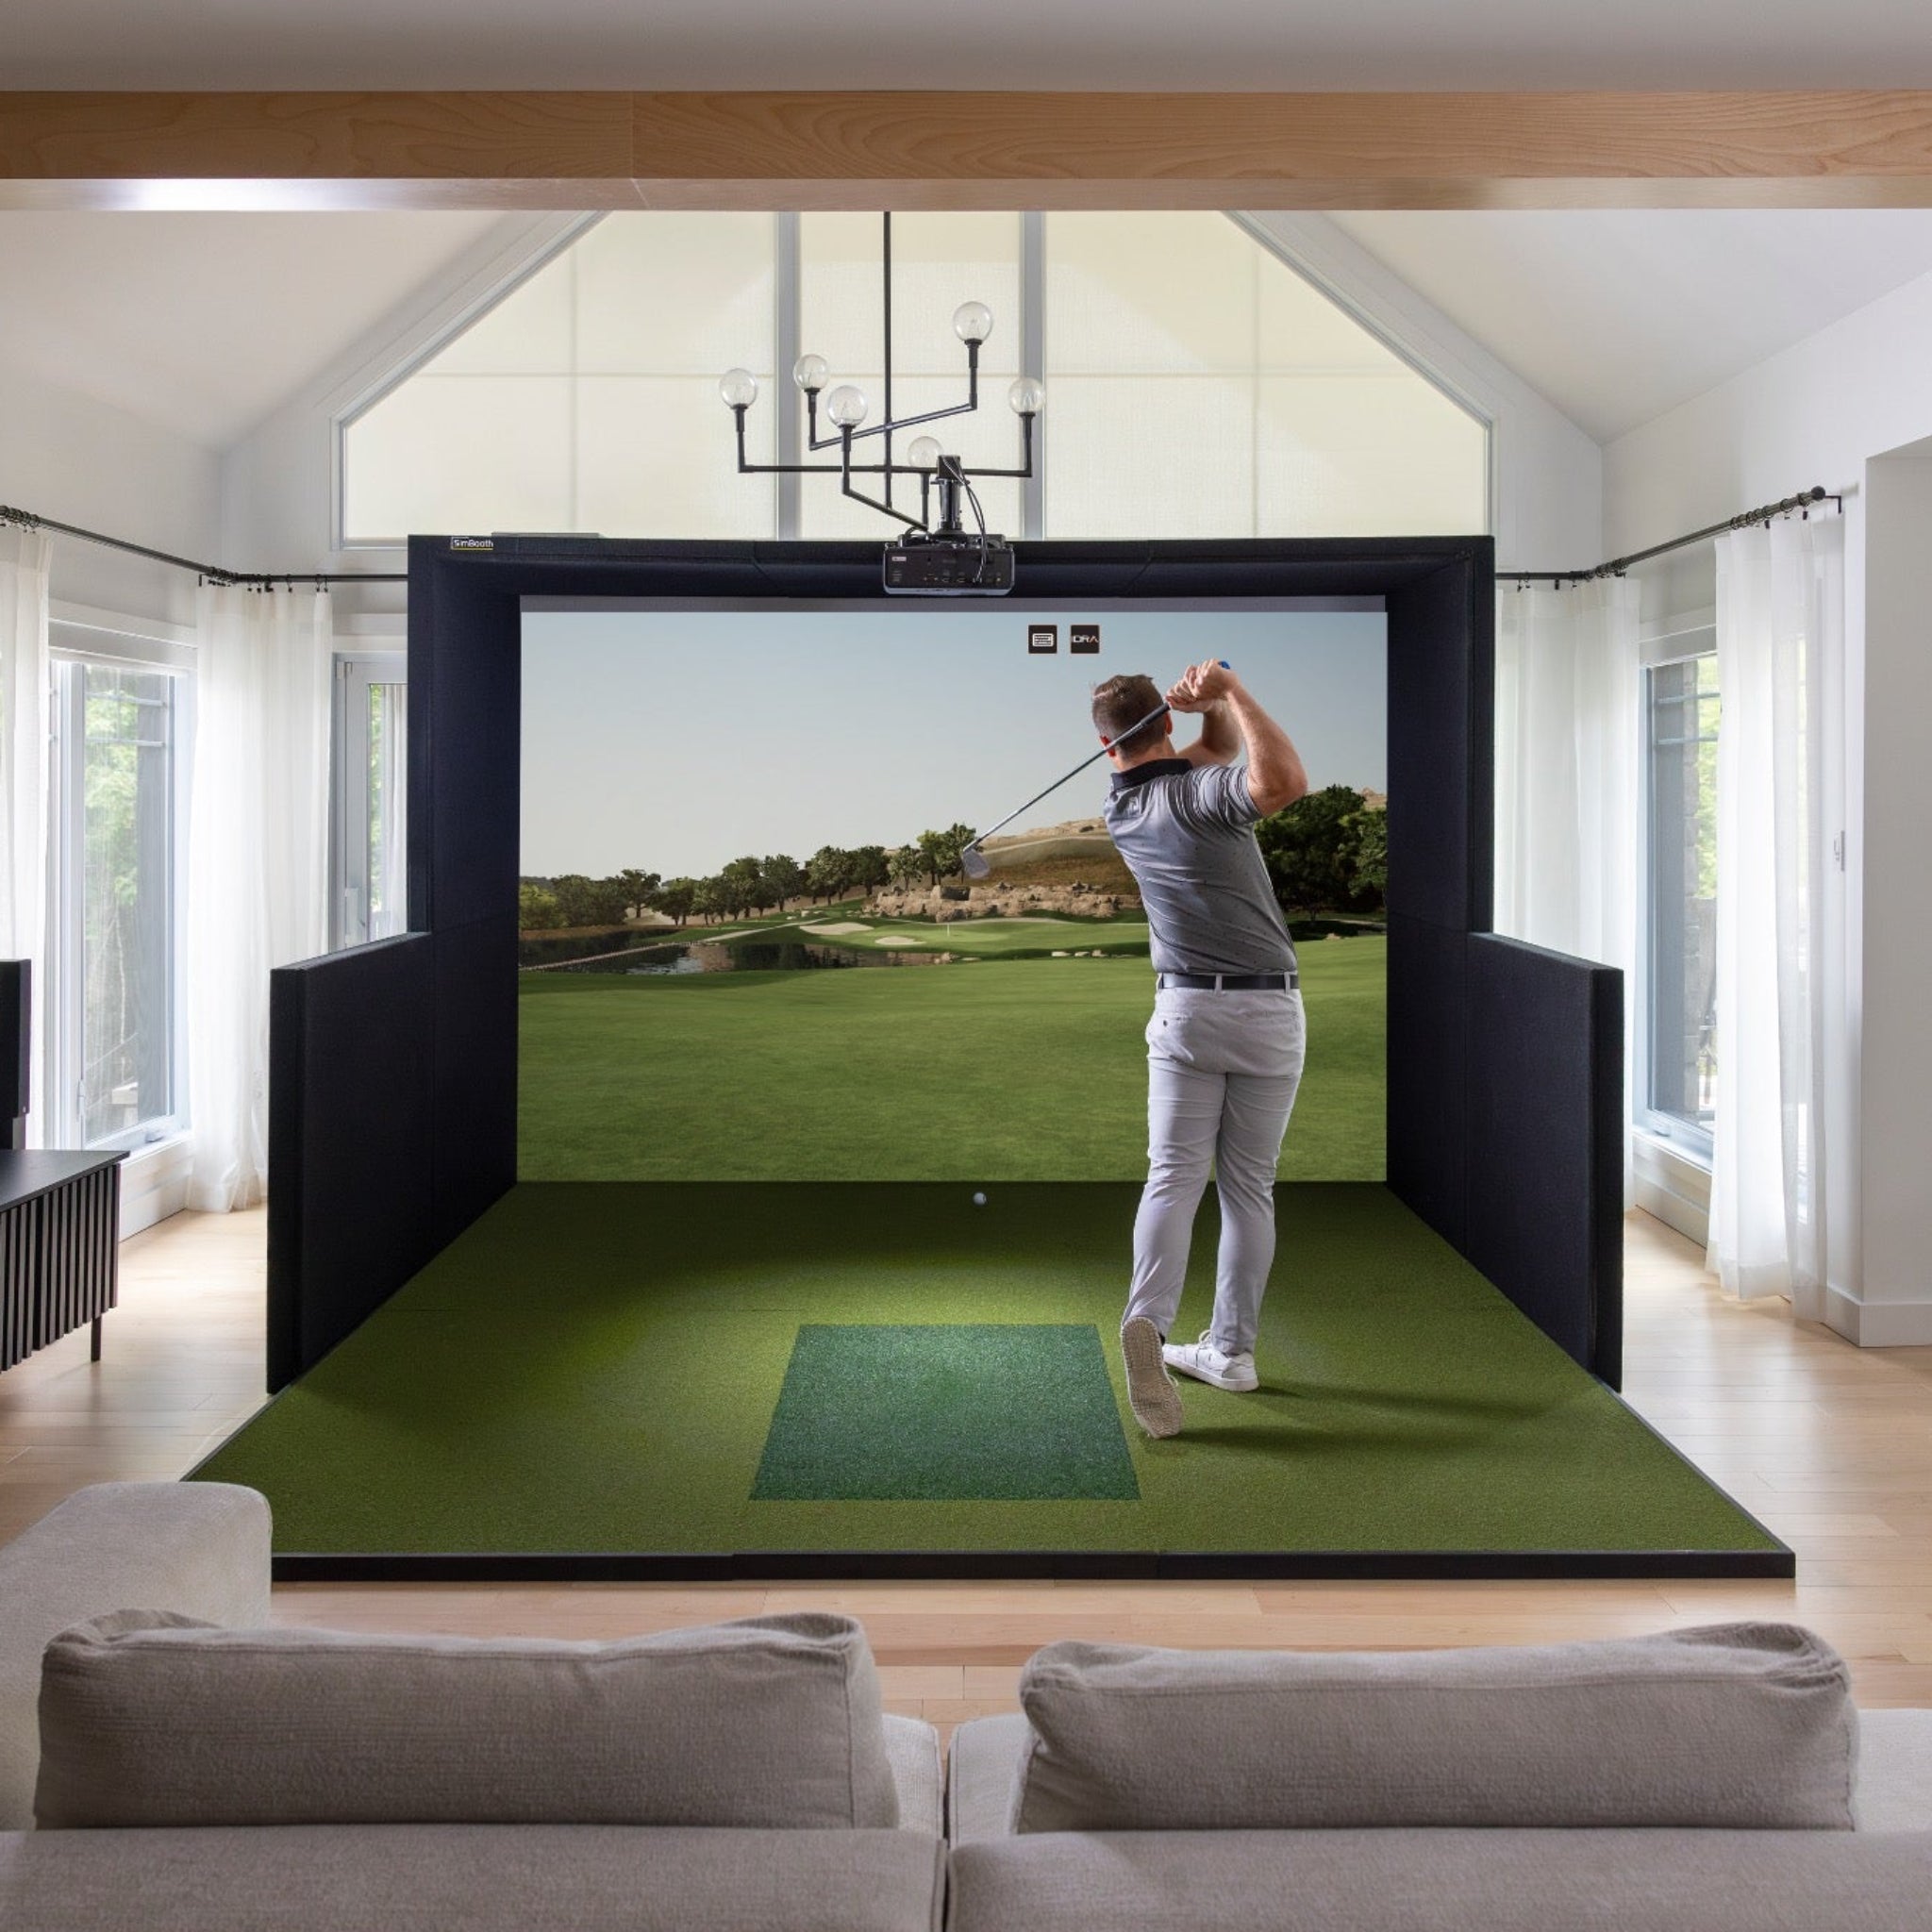
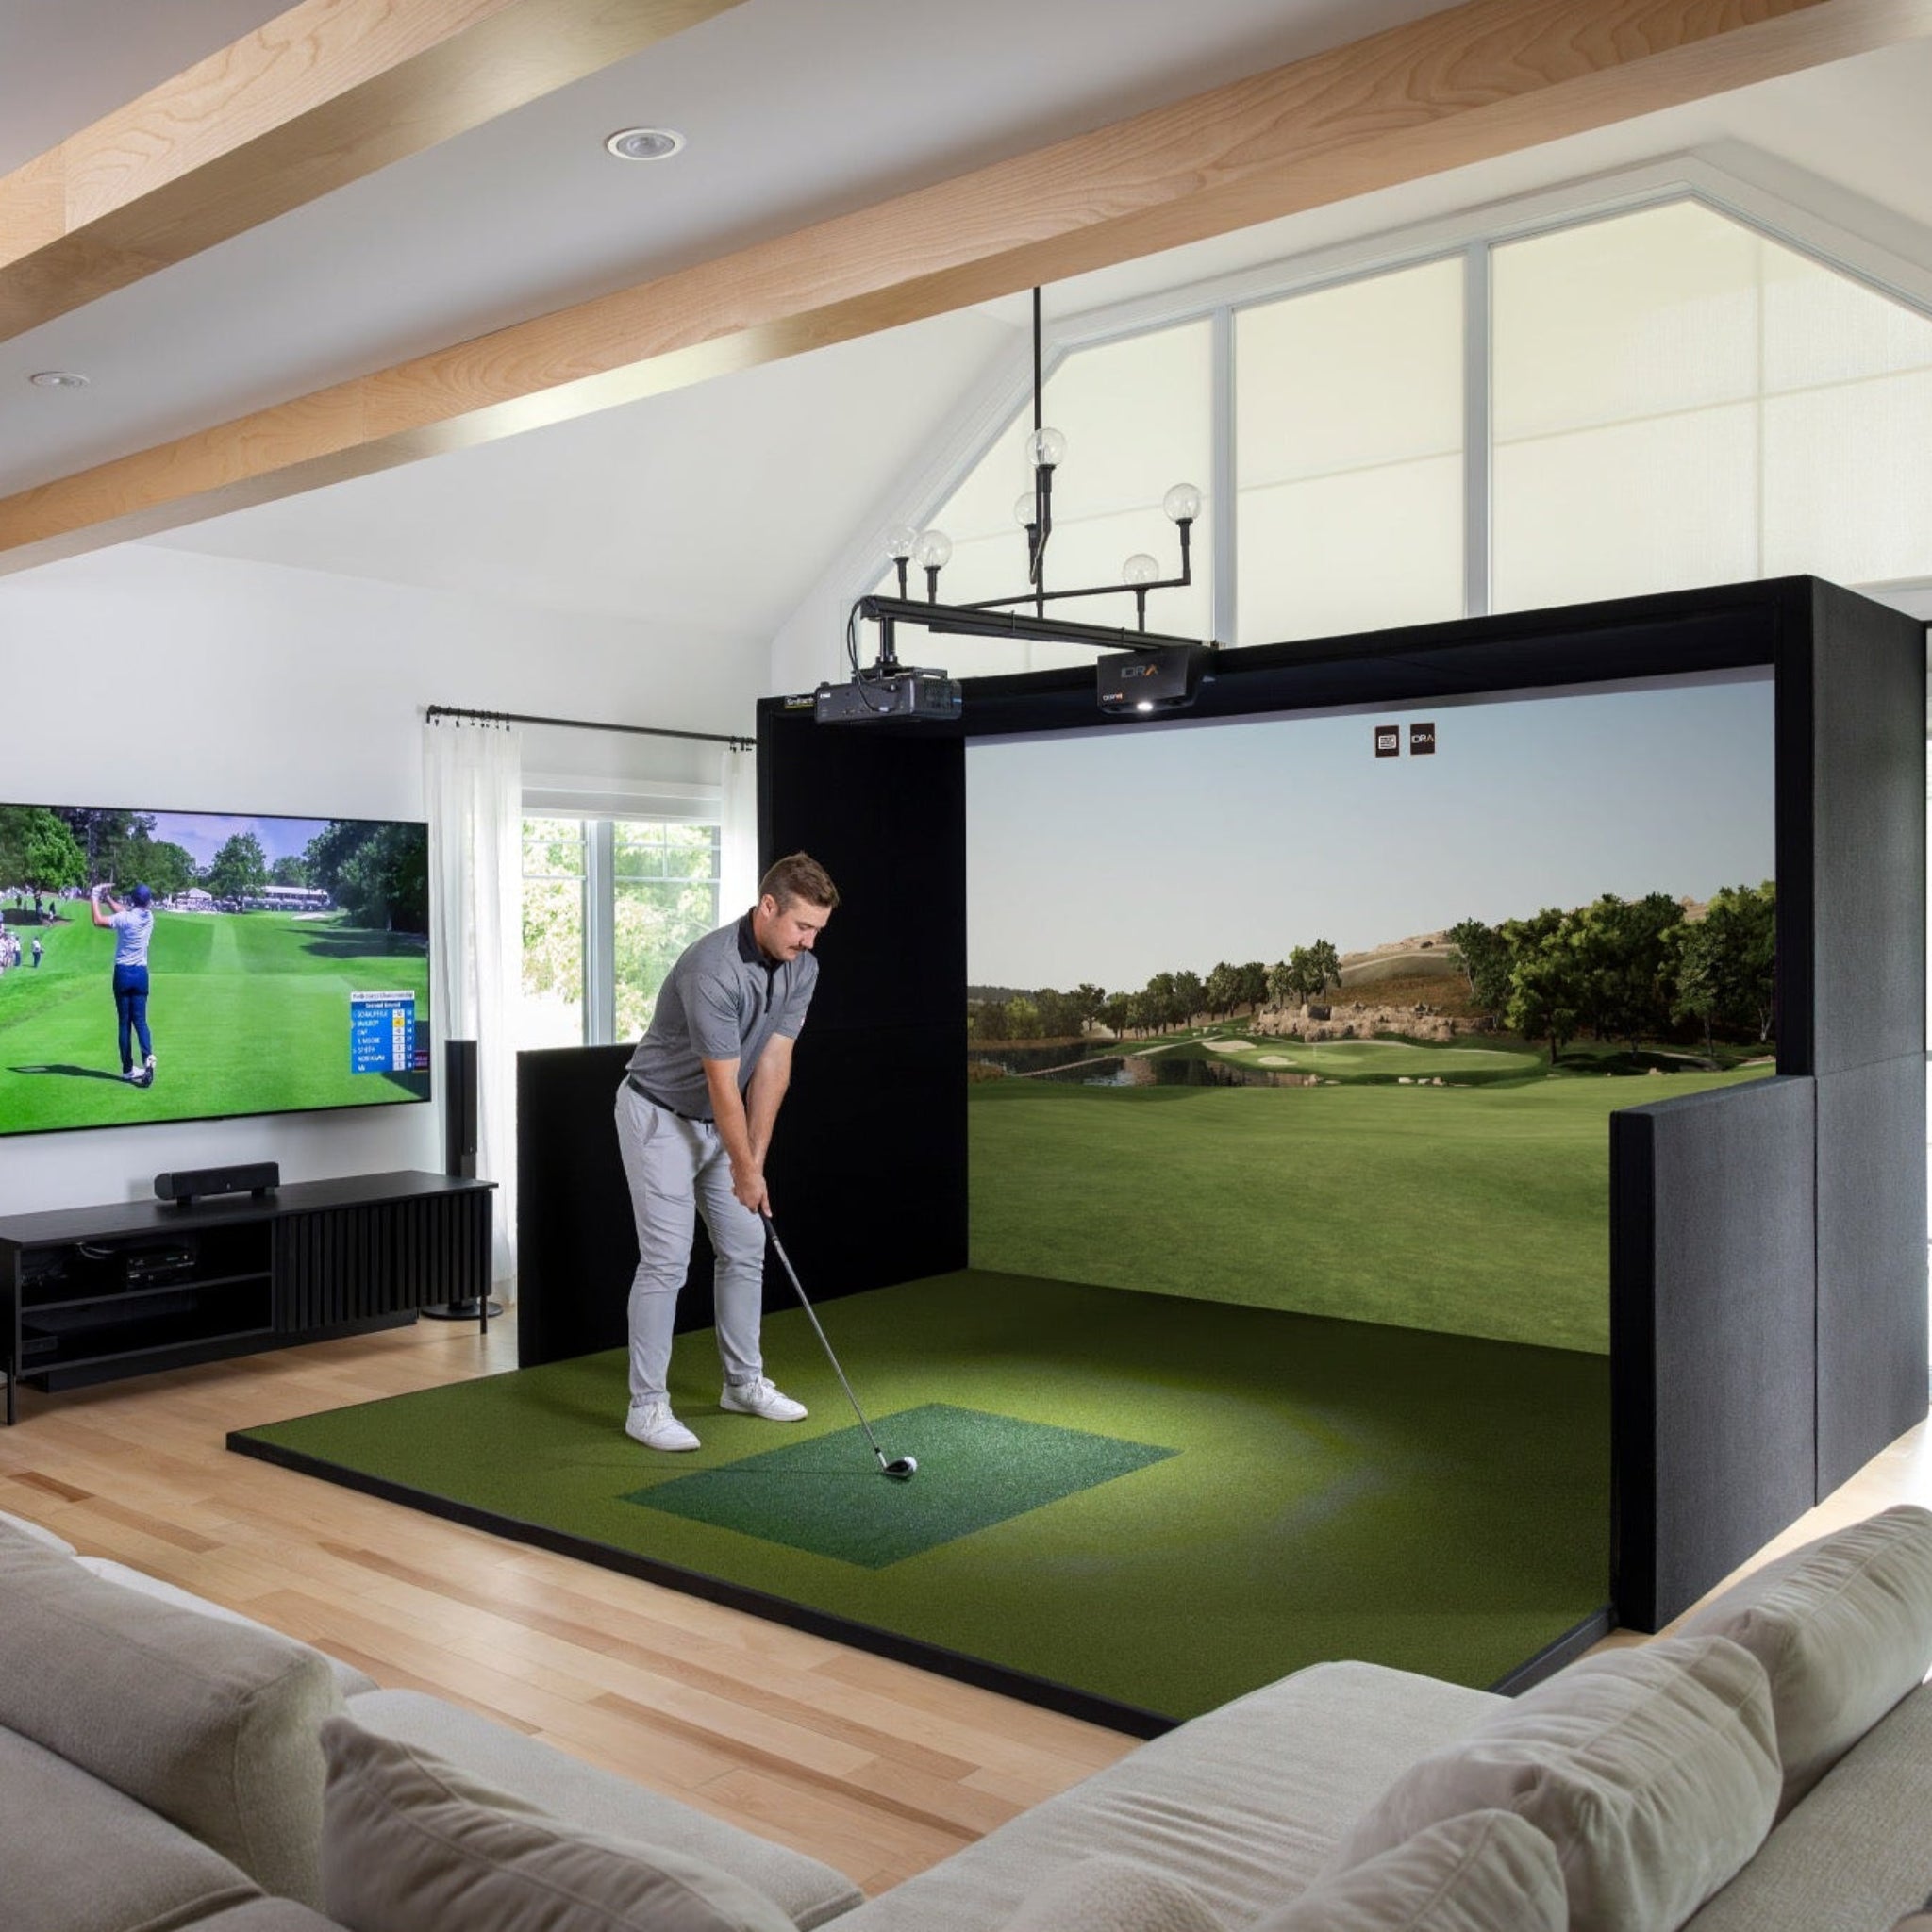
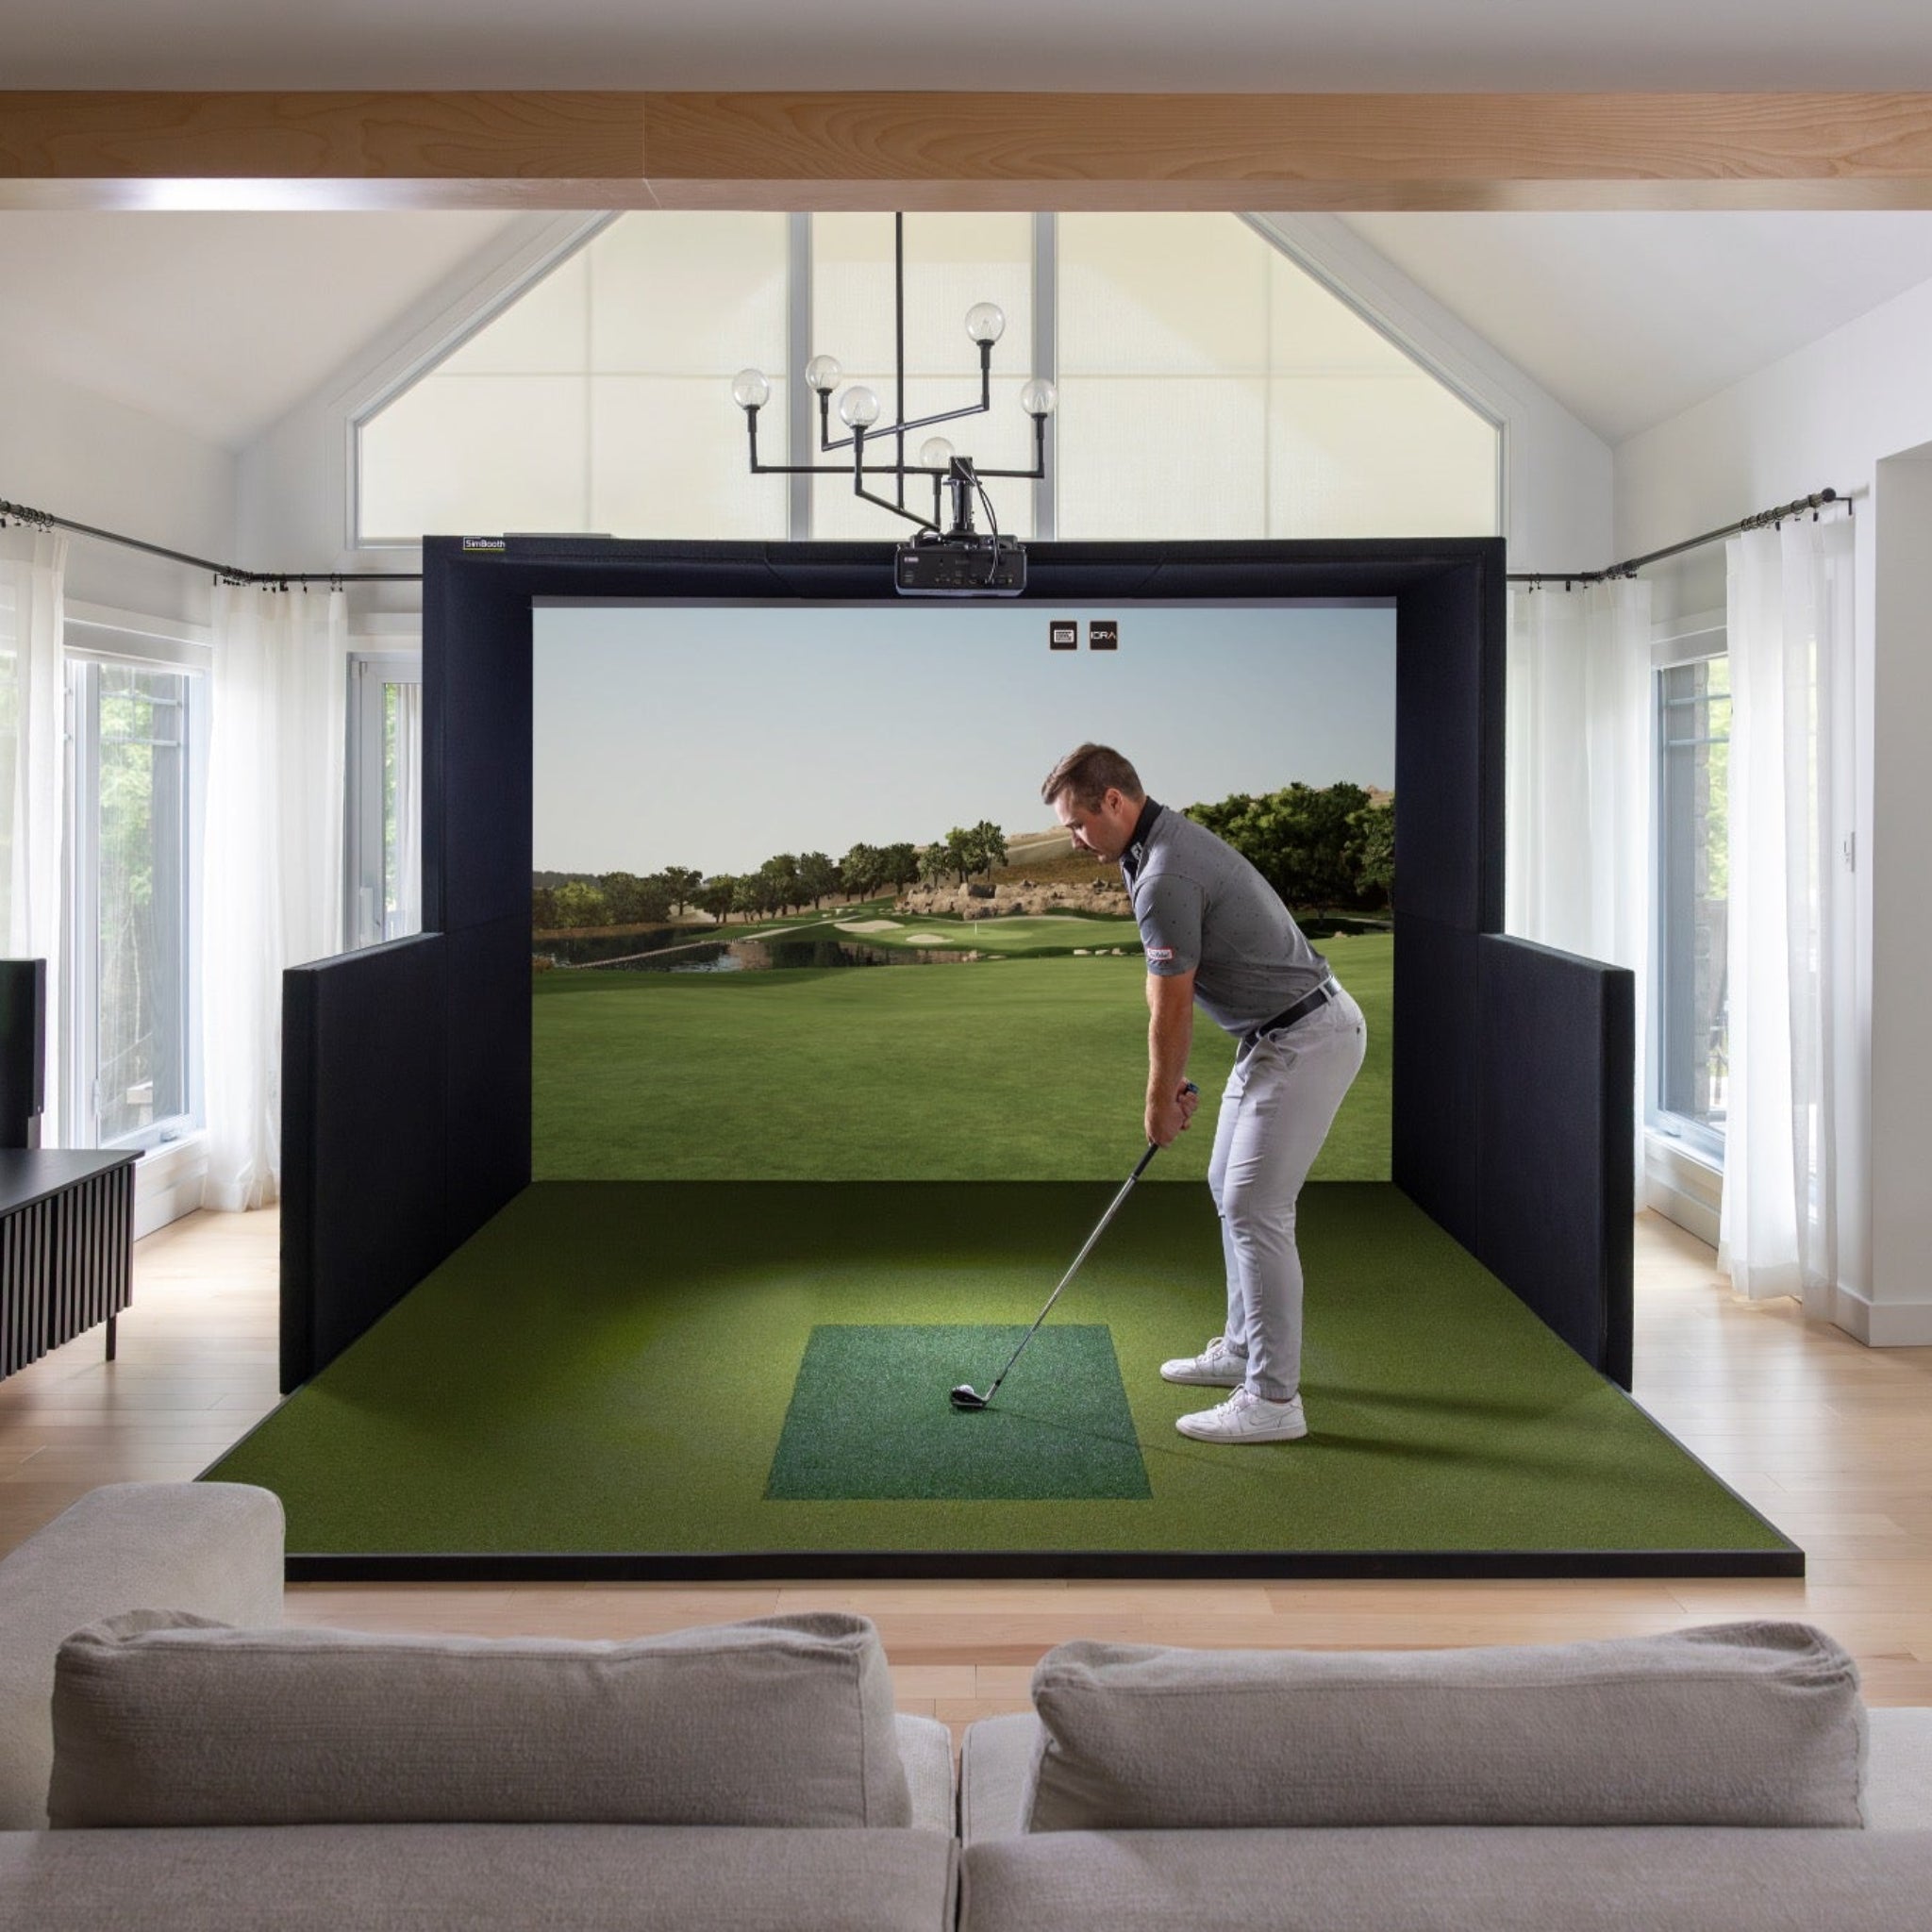
The SimBooth Kit 2 - 4K is the upgraded, turnkey golf simulator bundle built around the larger SimBooth 2 enclosure, with a true 4K laser projector for next-level image quality.
It is ideal for clubs, teaching bays, and higher-end home installs that want a wider, taller hitting bay and a crisp, ultra-detailed picture without having to source components from multiple vendors.
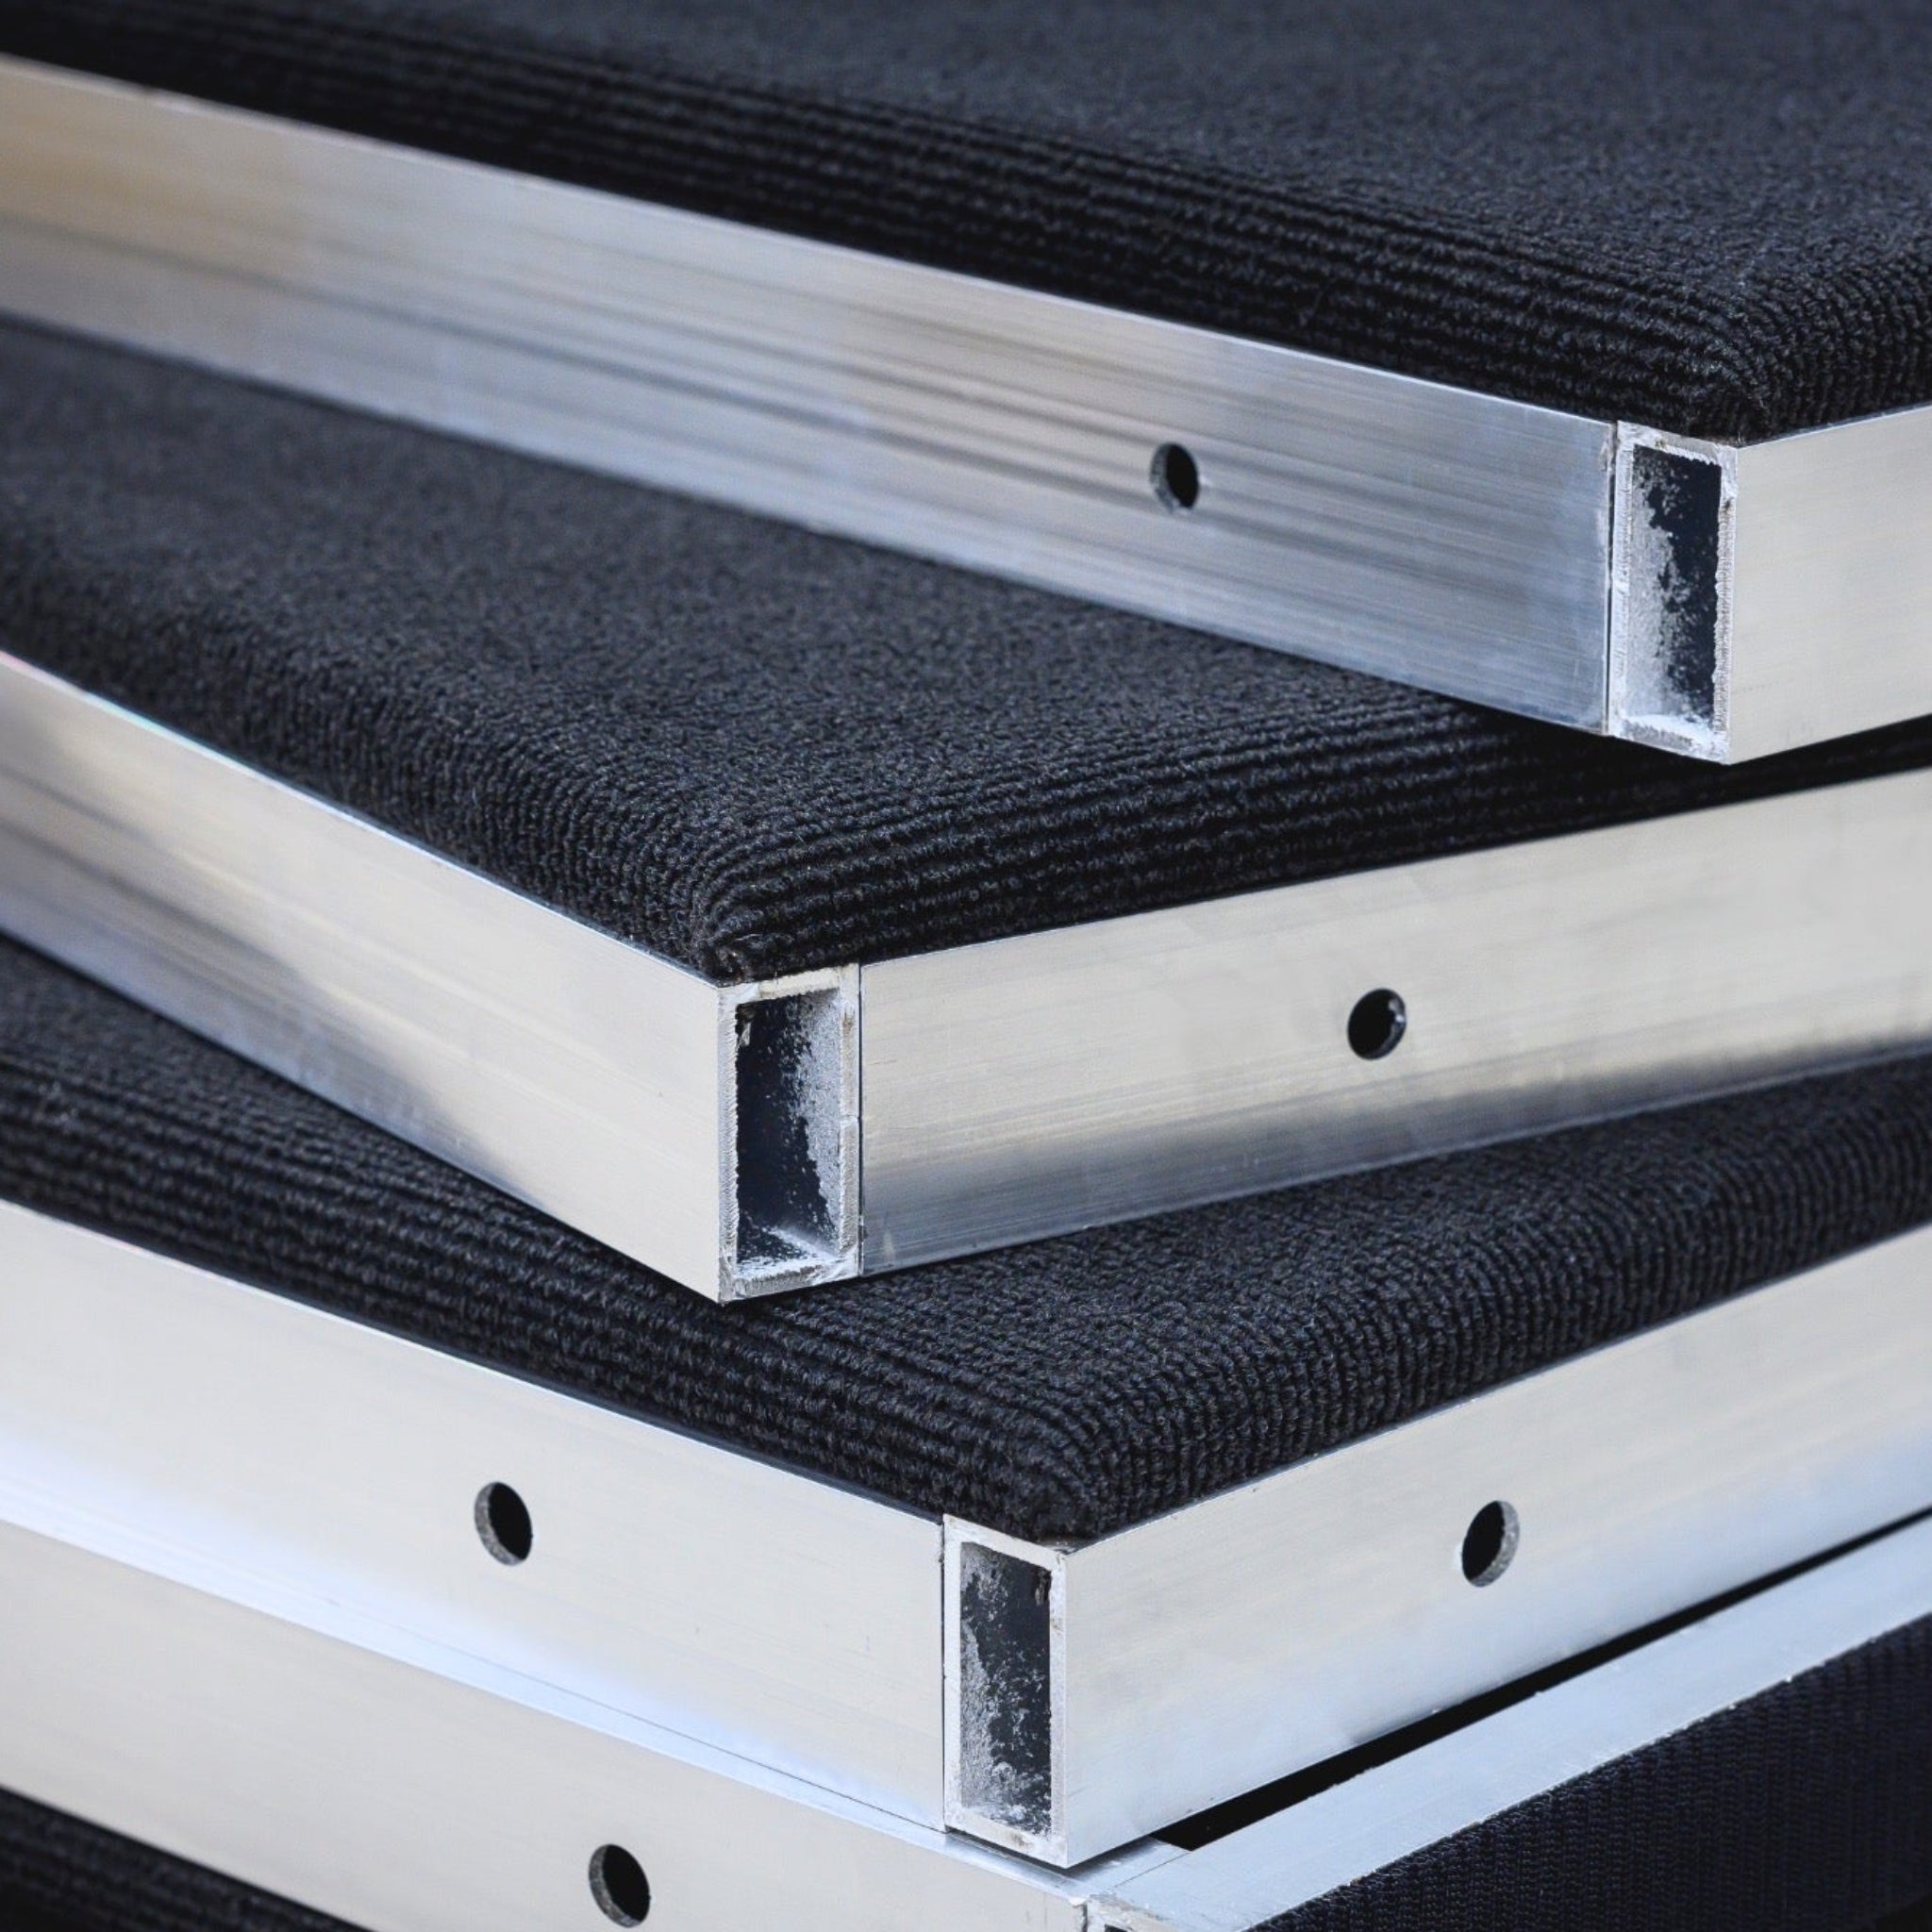
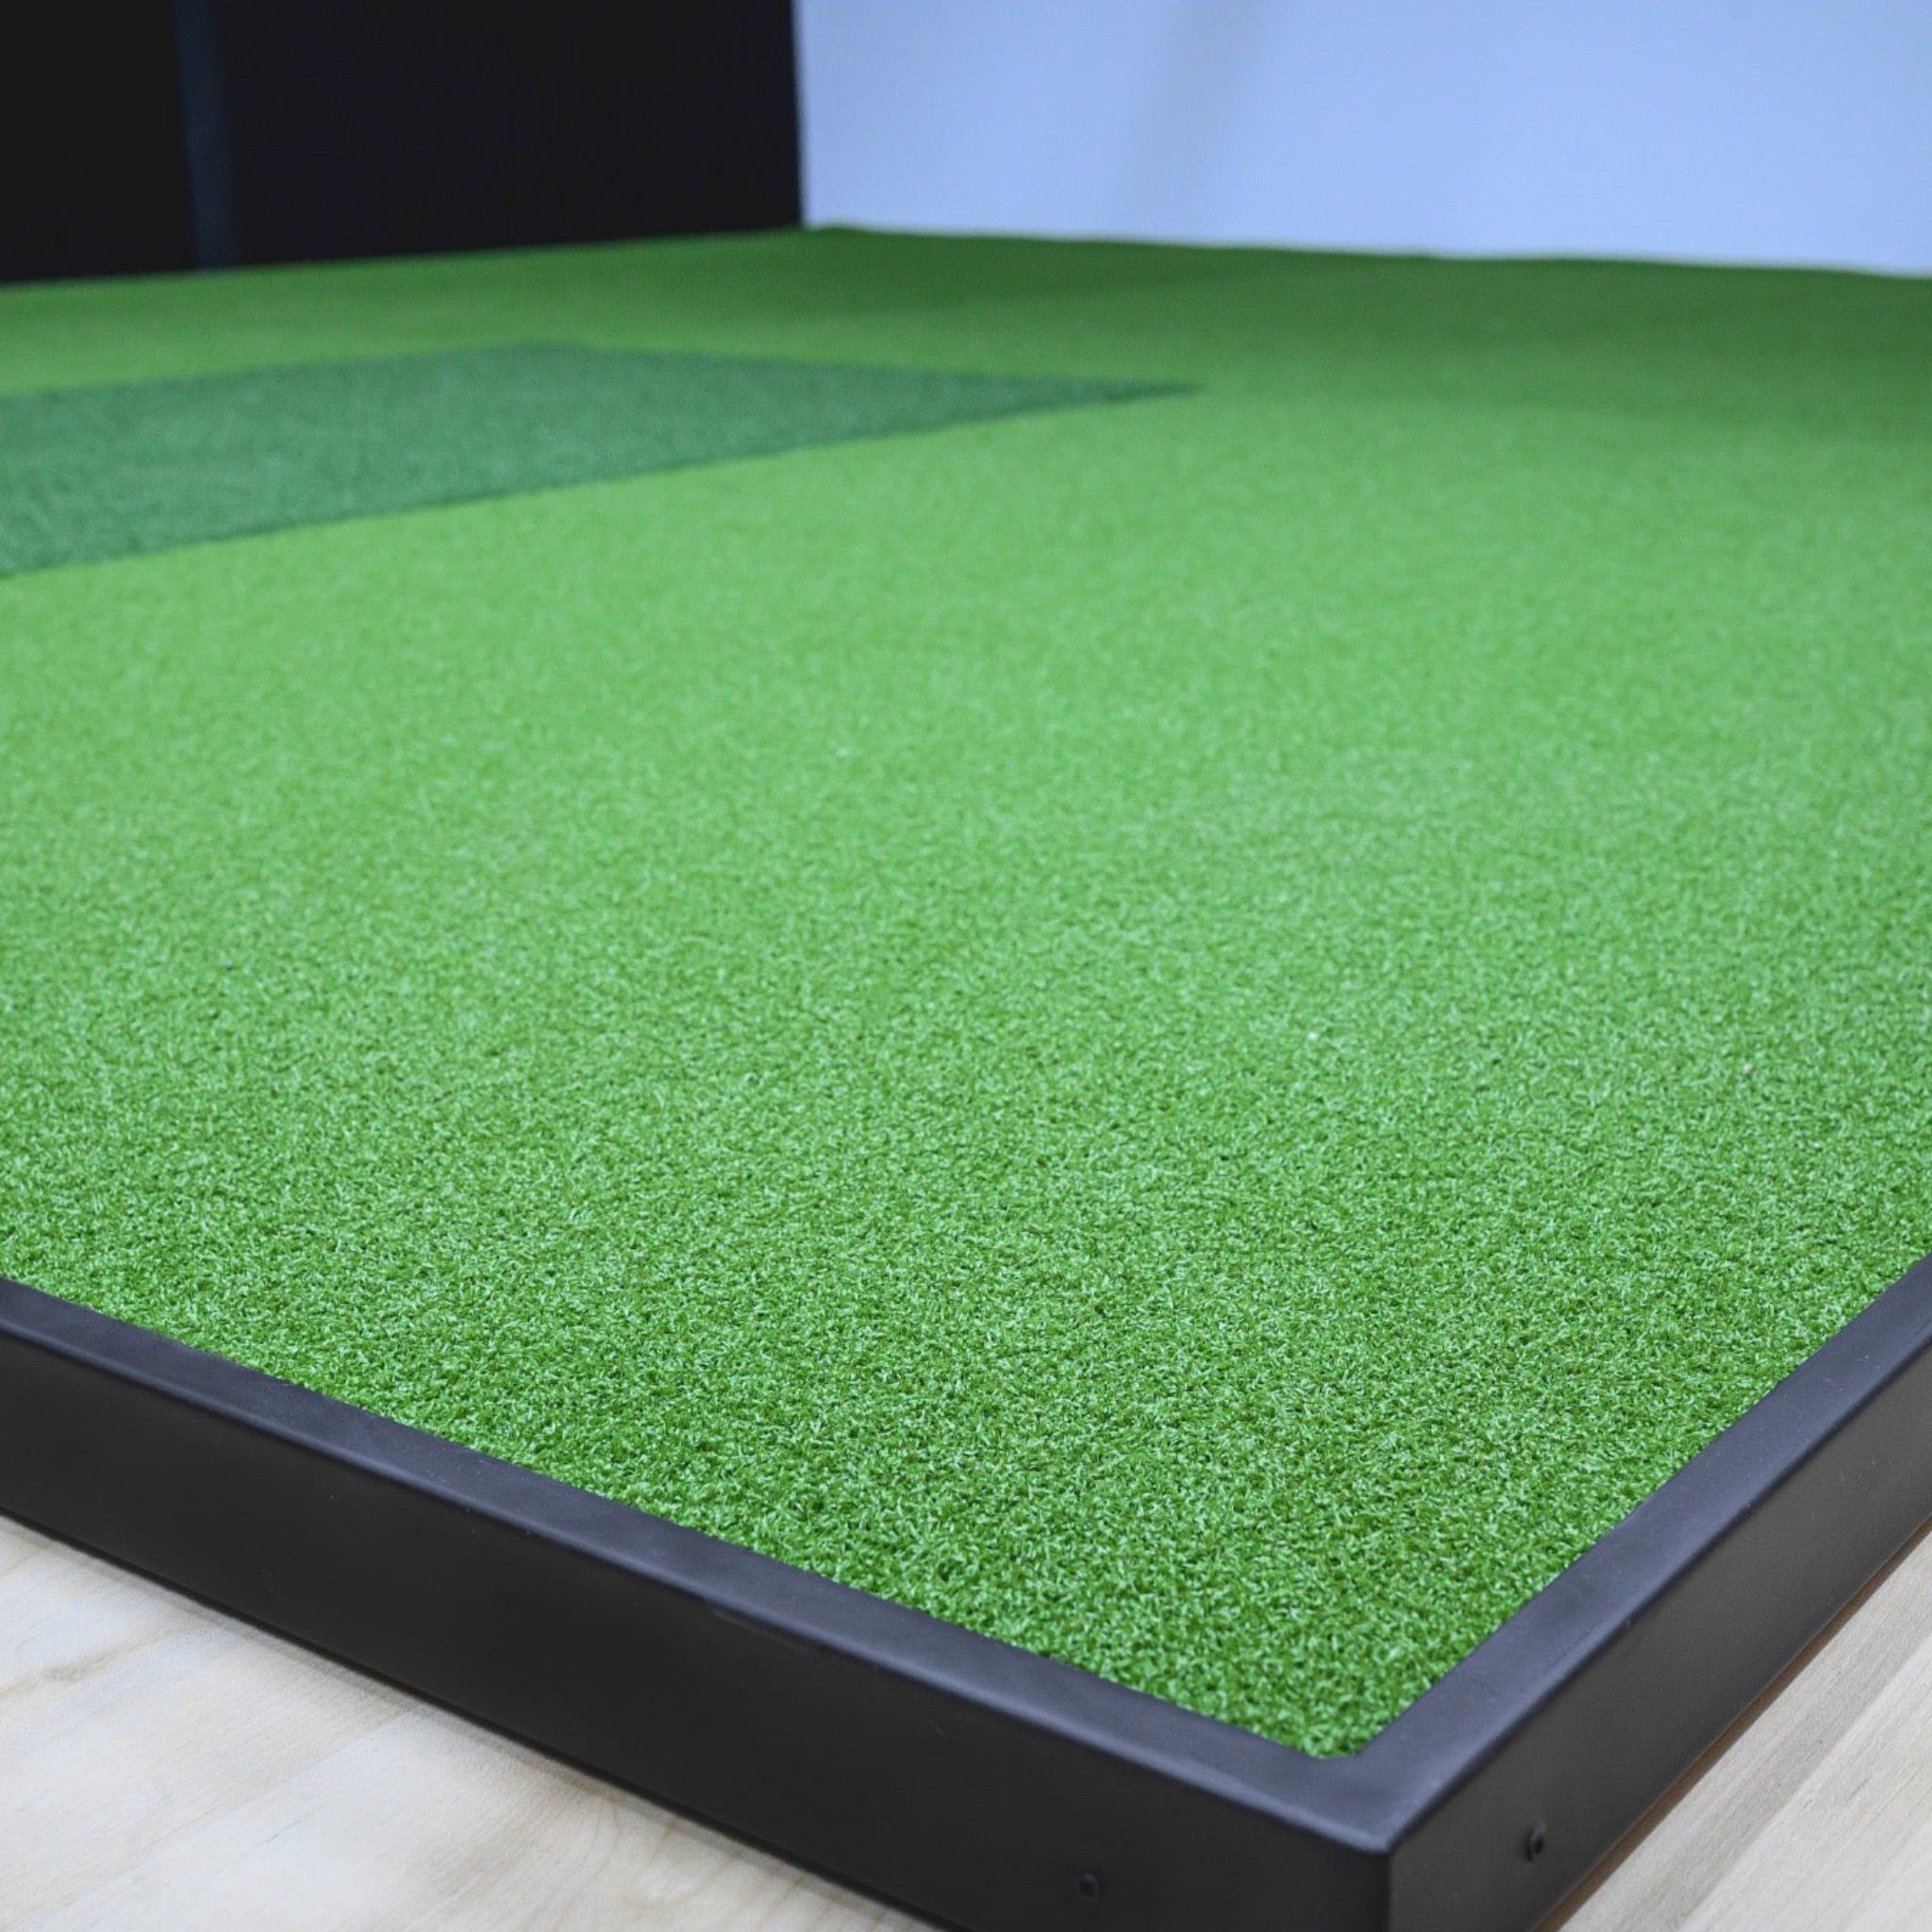
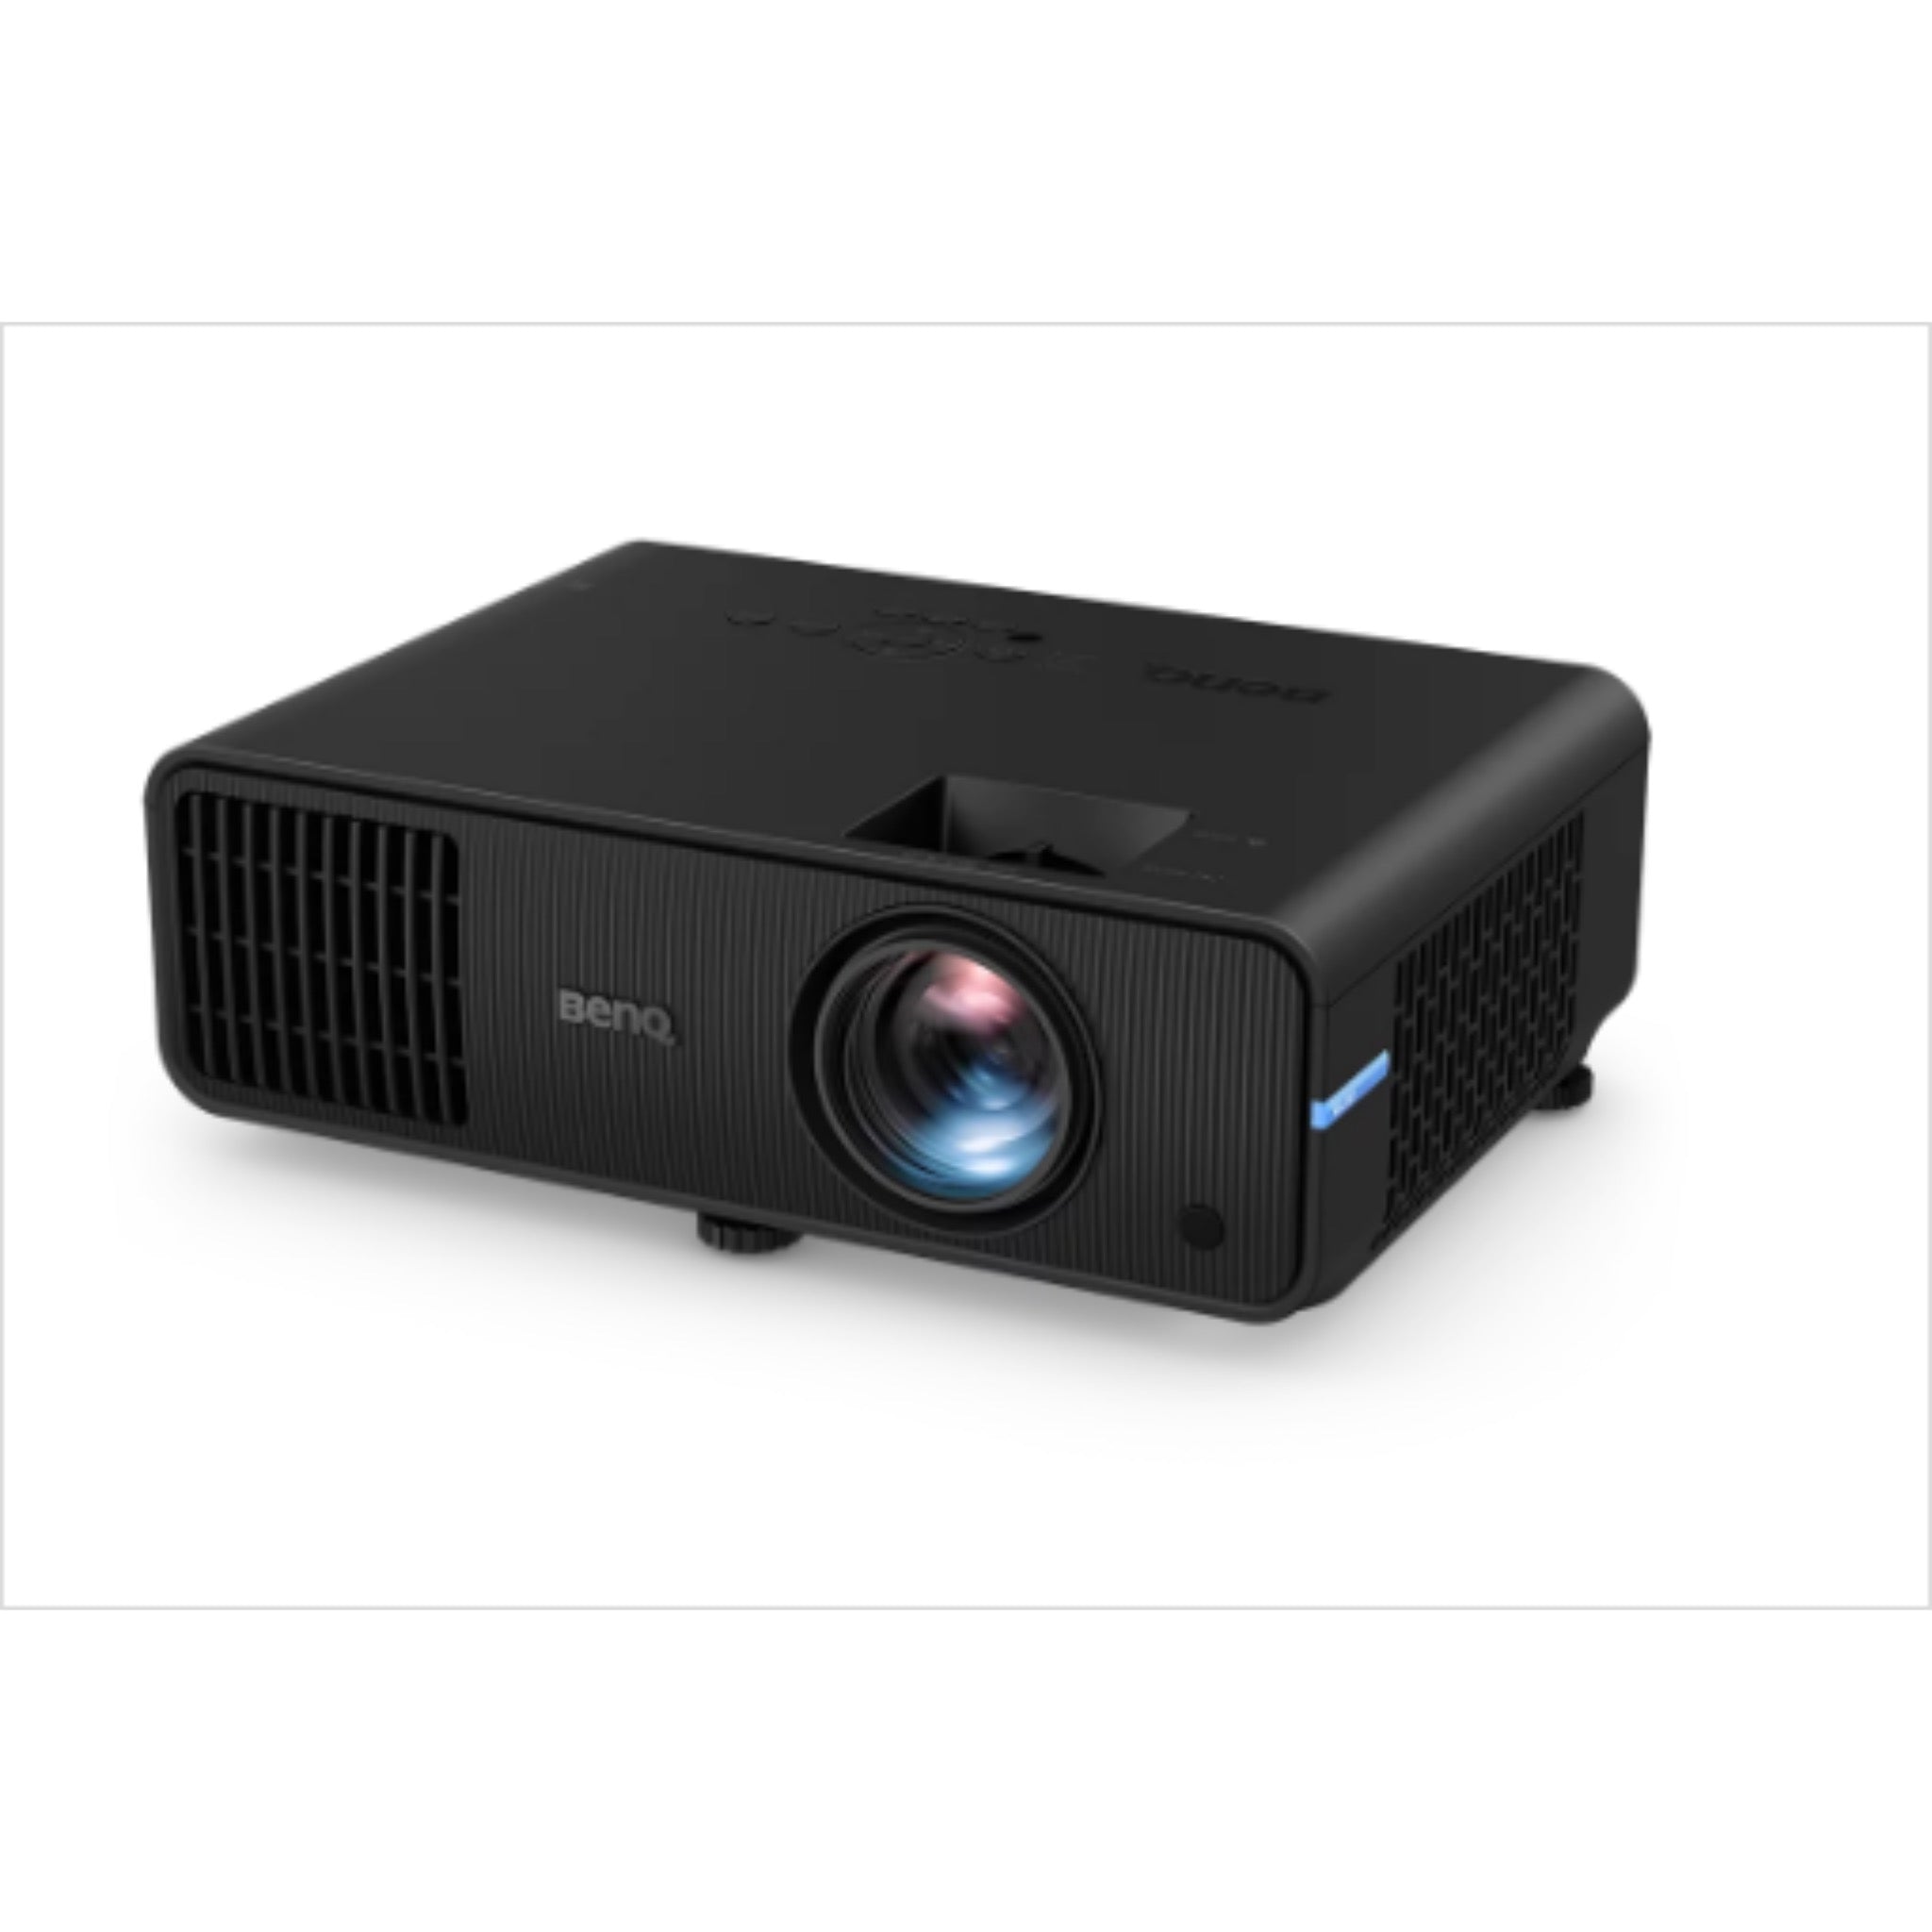
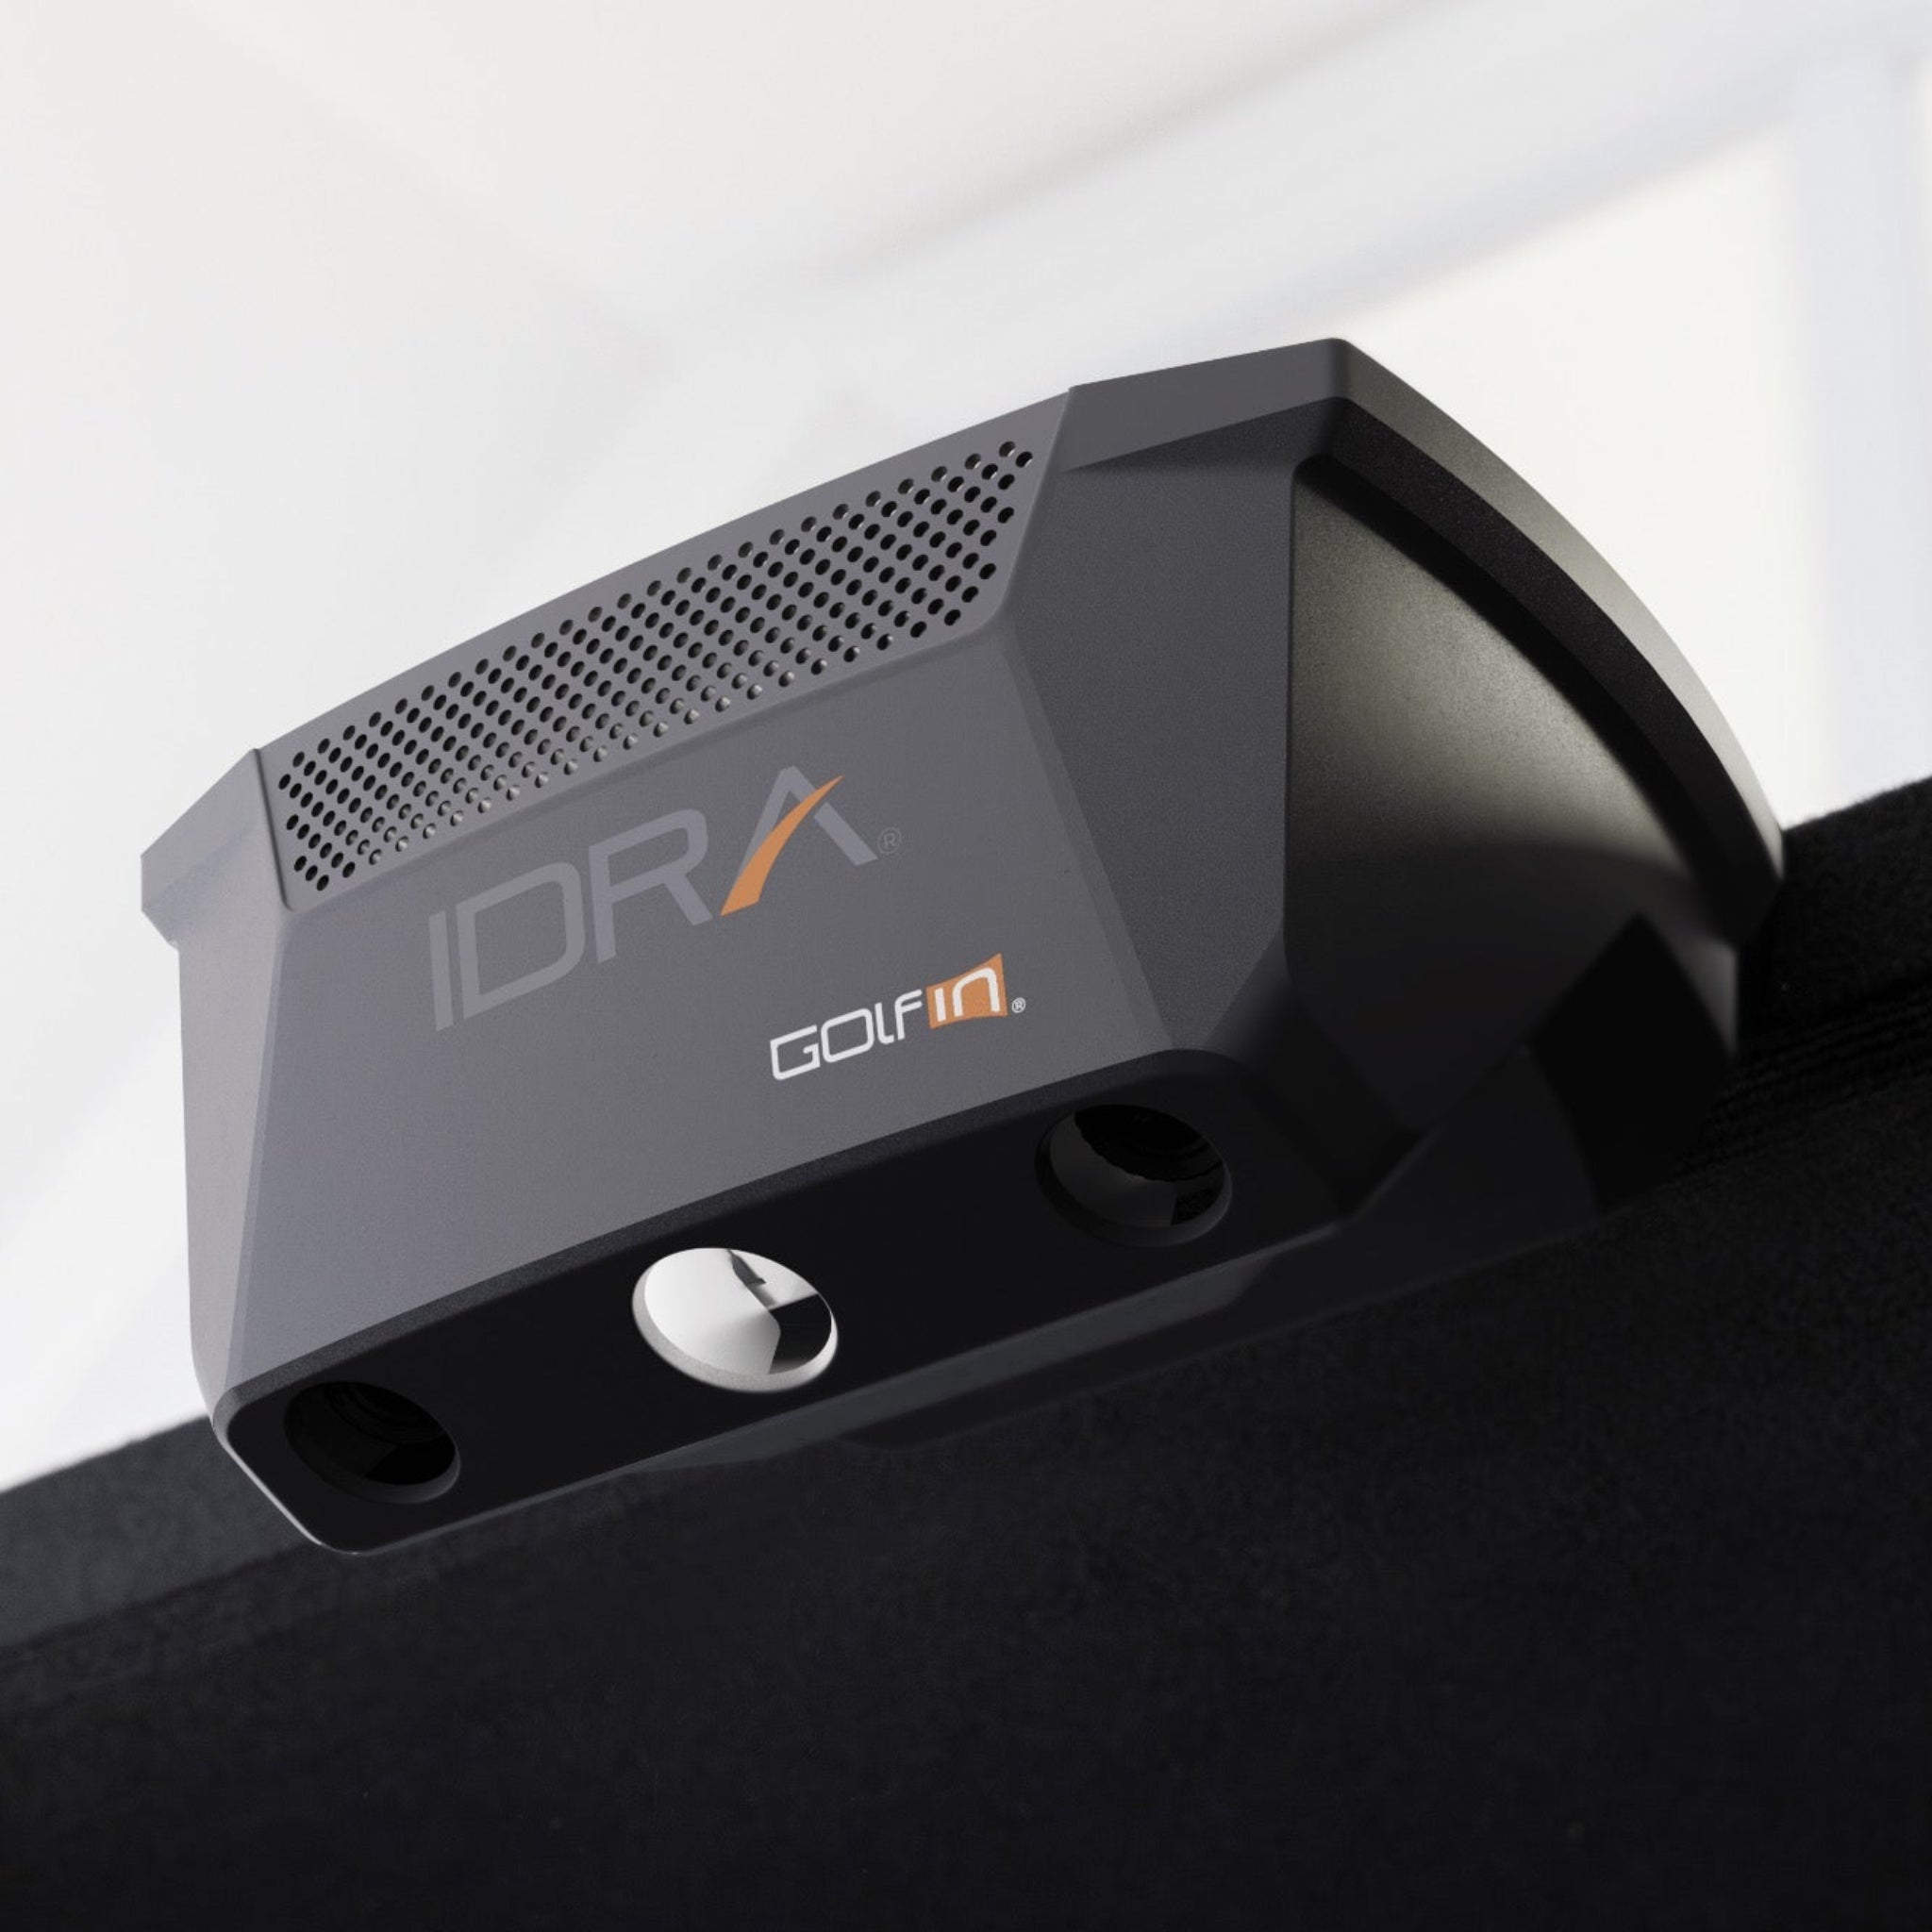
You get a heavy-duty aluminum enclosure, full-surface raised floor, half walls, a crease-free impact screen, and a 32” × 54” × 2” commercial hitting mat, plus the full tech stack: the IDRA II overhead launch monitor, 4K Laser BenQ AK700ST short-throw projector, and a 1-year GSPro membership.
The enclosure is approximately 12’1” wide × 12’ deep × 8’9” high, with recommended room space around 14’ W × 16’ D × 9’7” H or larger for comfortable swings, overhead mounting, and projector throw.
Everything arrives as a coordinated package so a capable team of 3–4 people can install it in a few hours and be ready to tee off in stunning 4K the same day.

Product Features
| Feature | Details |
|---|---|
| Larger SimBooth 2 Enclosure | Approximately 12’1” W × 12’ D × 8’9” H, offering extra width and height compared to smaller booths. |
| Designed for Facilities & Big Rooms | Sizing and structure work well in commercial and semi-commercial environments while still fitting many garages, studios, and bonus rooms. |
| Full-Surface Floor System | Raised platform runs across the entire bay so stance, ball position, and screen edge line up cleanly for a built-in look. |
| Half Walls for Containment | Left and right half walls help contain mis-hits and visually frame the hitting bay like a driving range stall. |
| Crease-Free Impact Screen | Screen is tensioned around the perimeter to help minimize wrinkles and reduce bounce-back for a more comfortable hitting experience. |
| Commercial Hitting Mat | Includes a 32” × 54” × 2” commercial mat designed for frequent use and realistic turf-like feedback. |
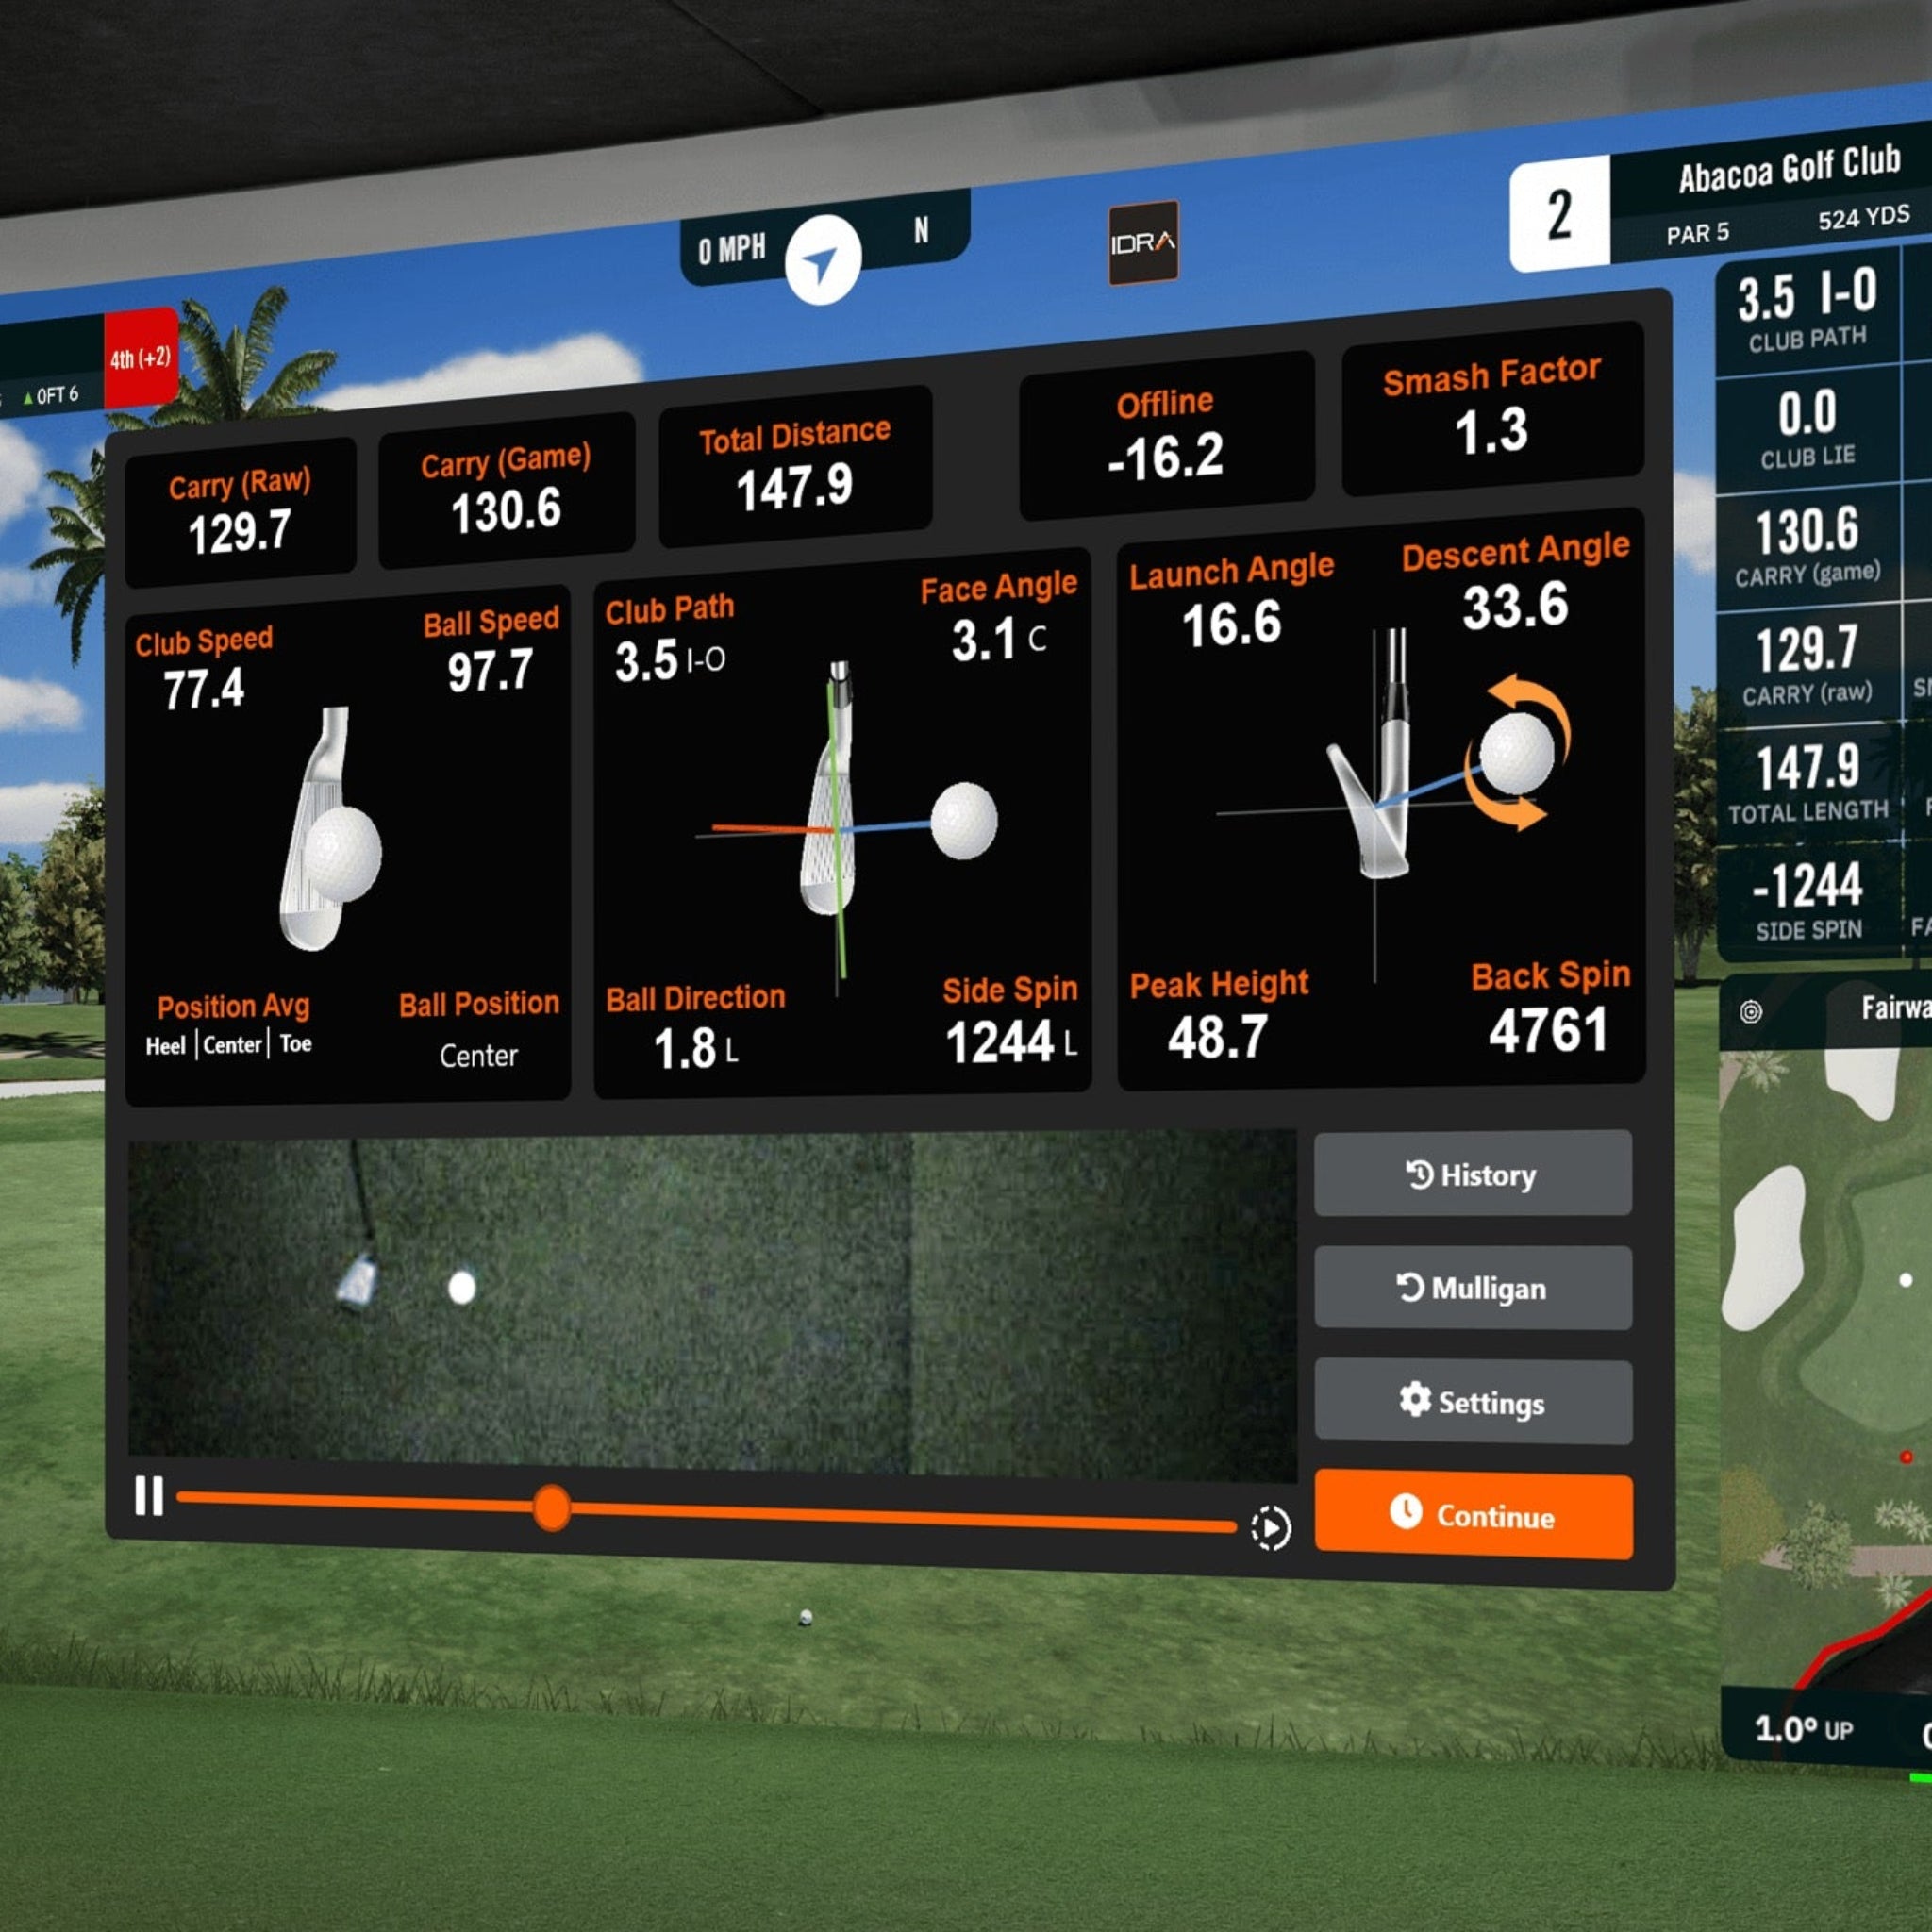
| IDRA II Overhead Launch Monitor | Ceiling-mounted, AI-enhanced launch monitor that tracks club and ball data without dots or specialty balls. |
| Right- and Left-Handed Player Friendly | Overhead mounting supports both right- and left-handed golfers in the same hitting zone without moving hardware. |
| 4K Laser BenQ AK700ST Projector | Golf-focused short-throw projector with true 4K resolution and a laser light source for sharp, bright, high-contrast visuals on the large screen. |
| GSPro Integration | Includes a 1-year GSPro membership with realistic ball physics, course library, and robust practice modes. |
| Self-Install Design | Panels, platform, and tech components are engineered for guided self-assembly using the included instructions and basic tools. |
| Single-Crate / Consolidated Delivery | Ships together so you can stage components in the final room and build in place without piecing together multiple shipments. |
What's Included
-
SimBooth Kit 2 enclosure
- Includes aluminum frame, solid black panels, left and right half walls, and ceiling panels.

-
Full-surface floor system
- Includes modular floor panels and integrated hitting mat cut-out.

-
Commercial hitting mat
- Approximately 32" x 54" x 2".

-
Impact screen
- Crease-free, low bounce-back impact screen with 16:10 ratio.

-
IDRA II AI overhead launch monitor
- Includes integrated light and required cabling.

- 4K Laser BenQ AK700ST short-throw projector

-
Projector beam / mount
- Designed for structure-mounted projector installation.

-
GSPro golf simulator software – 1-Year Membership
- Auto-renews after year 1 unless cancelled.

-
Required cabling
- Includes HDMI, USB, and power cables.
-
Basic hardware and tools for assembly
- Includes bolts, nuts, washers, wing nuts, and Allen keys.
- Basic installation instructions and documentation
Product Specifications
Enclosure & Room Specs
| Category | Specification |
|---|---|
| Enclosure Model | SimBooth 2 |
| Enclosure Dimensions | Approximately 12’1” W × 12’ D × 8’9” H |
| Screen Aspect Ratio | Large wide-format screen with 16:10-style coverage |
| Screen Diagonal | Approximately 170” class diagonal, depending on final tension and mounting |
| Minimum Recommended Room | Approximately 14’ W × 16’ D × 9’7” H |
| Ideal Room Size | Approximately 15’–16’ W × 20’–22’ D × 10’ H for extra swing and throw flexibility |
| Structure Material | Aluminum frame with solid side and top panels |
| Floor System | Full-coverage raised floor platform |
| Hitting Mat | 32” × 54” × 2” commercial mat |
Tech & Software
| Category | Specification |
|---|---|
| Launch Monitor | IDRA II overhead AI camera-based launch monitor |
| Mounting | Overhead mount to the SimBooth frame / ceiling over the hitting area |
| Tracking | Club and ball data, including club speed, path, face, ball speed, launch angles, spin, and related metrics per IDRA II specifications |
| Projector | BenQ AK700ST 4K Laser short-throw projector |
| Projector Resolution | Up to 3840 × 2160 4K UHD input |
| Projector Throw Style | Short-throw, optimized for golf simulator distances |
| Included Software | GSPro – 1-year membership |
| Typical PC Requirement | Modern gaming PC with RTX-class GPU, i7-class CPU or equivalent, 16–32 GB RAM, and SSD storage for smoother 4K play |
Getting Started Guide
-
Verify your room size
- Measure width, depth, and ceiling height to confirm your space meets or exceeds the recommended 14’ W × 16’ D × 9’7” H.
- Confirm there are no low beams, lights, fans, or other obstructions in the swing path.
-
Plan layout and PC location
- Decide where the SimBooth 2 will sit and where your PC will be located.
- Note nearby power outlets and network availability.
-
Unpack the crate
- Open the crate carefully and group parts by type.
- Separate enclosure frame pieces, wall / ceiling panels, floor panels, hitting mat, impact screen, IDRA II, projector, projector beam / rafter, hardware, and cabling.
-
Pre-stage in the final room
- Move all components into the final room before assembly.
- Lay out panels and key parts roughly where they will end up to visualize the bay footprint.
-
Review installation documentation
- Read through the SimBooth Kit 2 - 4K installation guide and IDRA II install guide before starting.
- This helps you understand the assembly sequence and mounting references.
-
Assemble the frame on the floor
- Build the ceiling section and upper frame while it is lying flat on the floor.
- Follow the diagrams for orientation and fastener locations.
-
Install lower panels and bracing
- Add lower wall panels and any structural braces specified in the guide to stiffen the enclosure before raising it upright.
-
Raise the enclosure into position
- With 3–4 helpers, tilt and lift the assembled frame into its final position.
- Check clearance to the walls and ceiling, then make minor adjustments as needed.
-
Install the screen and floor
- Mount the impact screen while tensioning the top, sides, and bottom evenly.
- Lay the full-surface floor panels and place the hitting mat into its designated area so it lines up with the hitting zone.
-
Mount IDRA II and projector
- Install the IDRA II overhead launch monitor at the recommended distance and height from the hitting area.
- Mount the BenQ AK700ST on the beam or rafter at an appropriate throw distance.
-
Connect PC, power, and data
- Run HDMI from the PC to the projector and USB / network from the PC to IDRA II.
- Secure cables so they are away from feet and swing paths.
-
Install GSPro and configure
- Install GSPro on your PC, activate your membership, and connect IDRA II.
- Confirm shots are detected and displayed correctly in the simulator.
-
Fine-tune and test in 4K
- Adjust projector zoom, focus, and keystone so the 4K image fills the screen sharply.
- Hit test shots and fine-tune launch monitor alignment and settings until ball flight and distances look realistic.
Product Installation Guide
-
Gather tools and helpers
- Plan for 3–4 adults for safe lifting and alignment.
- Have a tape measure, level, socket / wrench set, screwdrivers, ladders / step stools, and any tools suggested in the installation guide.
-
Assemble the ceiling frame
- On the floor, connect ceiling frame pieces using the supplied hardware.
- Confirm the frame is square by measuring diagonals before tightening fully.
-
Attach upper wall panels
- Bolt upper panels to the ceiling frame according to the layout diagram.
- Check that edges align and correct any misalignment before fully tightening fasteners.
-
Install lower wall panels and braces
- Attach lower wall panels to complete the sidewalls and back wall.
- Add any bracing or cross-members that stiffen the overall structure.
-
Add half walls
- Mount the left and right half walls at the specified locations on the frame.
- Ensure they are plumb and aligned with the main enclosure.
-
Raise the assembled structure
- With helpers, lift the enclosure from horizontal to vertical and slide it into its final room position.
- Check for adequate clearance to the ceiling and side walls.
-
Level and square the frame
- Use a level to confirm posts are vertical and the base is stable.
- Adjust slightly if needed so the frame is not twisted, which helps the screen hang flat and the floor sit properly.
-
Install the full-surface floor
- Lay floor panels in the sequence described in the guide so they interlock correctly.
- Confirm there is no rocking and that seams are tight.
-
Install the hitting mat
- Place the hitting mat in its cut-out or designated area.
- Make sure it is flush with the surrounding floor and aligned with the future hitting zone of IDRA II.
-
Mount the impact screen
- Attach the screen at the top center first, then work toward the corners and down the sides.
- Apply tension gradually to remove wrinkles while keeping some give for ball impact.
-
Mount IDRA II overhead
- Locate the pre-drilled mounting points outlined in the technical plan.
- Mount the IDRA II bracket, attach the unit, and route cables neatly along the frame.
-
Install projector beam and AK700ST
- Attach the projector beam / rafter to the enclosure as specified.
- Mount the BenQ AK700ST to the beam, roughly center it, and set an initial throw distance based on the screen size.
-
Cable management
- Run power and HDMI to the projector.
- Run USB / network cables for IDRA II back to the PC.
- Secure everything with clips or ties to keep cables out of walkways and swing paths.
-
PC and software setup
- Set your PC to output at the desired resolution, including 4K if supported.
- Install IDRA II software and GSPro, then follow the setup prompts to connect and calibrate.
-
Calibration and final checks
- Calibrate screen boundaries, hitting zone, and launch monitor alignment.
- Hit a series of test shots with multiple clubs.
- Walk around the bay to ensure no loose fasteners, protruding edges, or tripping hazards remain.
Brochures
Videos
Product Manual and User Guides
Technical Drawings
YouTube Reviews
Frequently Asked Questions
Shipping Policy
Simulator Direct processes and ships SimBooth orders using trusted freight and parcel carriers to help ensure reliable delivery and product protection.
Most SimBooth products are large, made-to-order golf simulator booths that ship directly from Sim Sports Corporation / SimBooth in Saint-Georges, Québec, Canada.
Shipping Methods & Charges
- SimBooth products typically ship via freight carriers due to their size and weight.
- Smaller accessory items may ship via standard parcel services where applicable.
- Shipping costs are calculated based on destination, order size, and shipping method.
- Shipping charges are displayed in your cart and at checkout before you place your order.
- These are the amounts that will be charged for shipping for SimBooth products.
- Free shipping is not guaranteed for SimBooth products.
- Free shipping only applies when it is clearly stated on the product page and/or at checkout.
- Unless “Free Shipping” is clearly shown for your order, standard shipping charges apply.
- International shipments, including shipments from Canada to the United States, may be subject to additional duties, taxes, or brokerage fees.
- These charges are set by local authorities and, when applicable, are the responsibility of the recipient.
Lead Time & Processing
- SimBooth enclosures and kits are manufactured and shipped to order.
- Lead times may vary based on configuration, production schedule, and carrier availability.
- Estimated lead times or ship windows will be shown on the product page or communicated on your order confirmation whenever possible.
- All timeframes are estimates only and may vary due to production workload, carrier routing, customs clearance, weather, or seasonal volume.
- Tracking details will be provided by email once your order has shipped so you can monitor its progress.
Freight Deliveries & Special Services
- SimBooth enclosures and golf simulator booths are typically shipped on pallets via freight carriers.
- Freight deliveries are usually made curbside at a residential address or to a commercial loading dock.
- If you require special services, please contact support@simulatordirect.com before placing your order.
- Examples may include lift-gate service, inside delivery, or scheduled delivery appointment where available.
- We can provide a quote and help set expectations before your order is placed.
- Because SimBooth ships from Canada, freight transit times may include customs processing.
- Any additional paperwork required by the carrier or customs broker must be completed promptly by the customer to avoid delays.
Return Policy
We want you to be satisfied with your SimBooth purchase. Because SimBooth products are large, made-to-order golf simulator enclosures, returns and exchanges follow SimBooth’s reseller drop-shipping return policy and are subject to specific conditions.
Return Eligibility
- Returns must be requested within 30 days of the original purchase date.
- Returns requested after 30 days are not eligible for refund or exchange.
- Items must be unused, in the same condition as received, and in their original packaging.
- All parts, panels, hardware, and accessories must be included.
- All SimBooth returns require written authorization from Simulator Direct before the product is shipped back.
- Unauthorized returns may be refused or returned to the sender.
- Partial kit returns are not accepted.
- The full kit or booth must be returned together unless otherwise authorized in writing.
- High-value orders are processed shortly after purchase.
- Cancellation requests must be submitted promptly to help avoid processing fees.
Return Shipping & Restocking
- For non-defective SimBooth returns, the customer is responsible for all return shipping costs.
- Original shipping charges are non-refundable.
- Once the returned item is received and inspected by SimBooth, an approved refund will be issued to the original payment method, generally within 15 days.
- SimBooth deducts a combined shipping and handling fee equal to 15% of the original cost from the refund.
- This 15% deduction is part of SimBooth’s reseller return policy and will be passed through on qualifying returns.
- Additional carrier fees may also be deducted from the refund when applicable.
- This may include refused delivery fees, missed delivery appointment fees, storage fees, or similar carrier charges.
- We strongly recommend using a trackable and insured shipping service for any authorized SimBooth return.
- SimBooth cannot guarantee receipt of items shipped without tracking or sufficient insurance.
Defective or Damaged Items
If you receive a SimBooth product that is damaged in transit or appears defective, please follow the steps below.
- Contact support@simulatordirect.com as soon as possible, ideally within 15 days of receiving your order.
- Please include:
- Your order number.
- Photos of the packaging.
- Photos of the damage or defect.
- A clear description of the issue.
- We will coordinate with SimBooth to review the issue and provide instructions.
- SimBooth may authorize a replacement, exchange, or repair in line with their warranty and return policies.
- Damaged or defective items must be reported promptly and require a valid RMA before shipping the product back.
- RMA stands for Return Merchandise Authorization.
Non-Returnable Items
- Products that have been installed, heavily used, modified, or returned without original packaging may not be eligible for a standard return.
- Items identified as “non-returnable” on the product page or invoice are not eligible for refund except where required by law or covered under SimBooth’s warranty.
- Because SimBooth booths and kits are large custom-configured packages, return eligibility must be confirmed before any product is shipped back.
Return Process
- Email support@simulatordirect.com with your order number, a description of the issue, and clear photos if the item is damaged or defective.
- Wait for written authorization and detailed return instructions.
- We will obtain a return authorization and RMA number from SimBooth when required.
- Ship the product to the address provided using the RMA number.
- The product must be shipped in original or equivalent protective packaging.
- All components must be included.
- Once the item is received, inspected, and approved by SimBooth, we will process any applicable refund to your original payment method.
- Refunds are issued minus any applicable shipping and handling deductions.
- Refunds are typically processed within 15 days of SimBooth’s approval.
Order Changes & Cancellations
If you need to change or cancel a SimBooth order, please contact support@simulatordirect.com as soon as possible.
- Orders that have not yet entered production or shipment may sometimes be adjusted or cancelled without penalty.
- Once a SimBooth order has entered production, been packaged, or shipped, changes or cancellations are no longer guaranteed.
- Orders that can no longer be cancelled will be handled under the standard Return Policy outlined above.
- Because SimBooth booths are made-to-order, late-stage cancellations may be subject to shipping, handling, and/or restocking deductions similar to a standard return.
- Any such fees will be disclosed before a cancellation is finalized.
Warranty & Replacements
SimBooth products purchased through Simulator Direct are covered by Sim Sports Corporation’s official Limited Warranty for SimBooth golf enclosure parts. This warranty applies to buyers and authorized resellers that purchase products directly from Sim Sports Corporation.
SimBooth Limited Warranty
According to the SimBooth Warranty Policy, the following components are covered from the date of purchase:
- Aluminum structure of simulator booth: 5 years.
- Panels: 1 year.
- Flooring and turf: 1 year.
- Back impact mesh: 1 year.
- Hitting mat: 1 year for fabrication defects only.
- White projection screen: 1 year for fabrication defects only.
- Technology IDRA II: 2 years when included as part of a SimBooth Kit.
Warranty Exclusions
This warranty covers defects in materials and workmanship under normal use. It does not cover:
- Damage caused by misuse, abuse, accidents, or unauthorized modifications.
- Normal wear and tear, including cosmetic damage.
- Damage caused by improper installation, repair, or maintenance.
- Damage caused by power failures, power surges, fire, flood, or other events beyond the reasonable control of Sim Sports Corporation.
Sim Sports Corporation determines whether any exclusions apply, at its reasonable discretion, based on remote troubleshooting and/or examination of the returned product.
Warranty Service & Shipping
If you believe a SimBooth component is defective and covered by warranty, please follow the steps below.
- Notify support@simulatordirect.com as soon as you discover the defect.
- SimBooth requires warranty issues to be reported within 7 days of discovery.
- Provide your order number, proof of purchase, photos, and a detailed description of the issue.
- We will coordinate with Sim Sports Corporation to initiate a warranty claim and obtain an RMA if needed.
Under SimBooth’s warranty policy:
- Sim Sports Corporation will, at its discretion, repair or replace the defective part or parts free of charge once a valid warranty claim is confirmed.
- If the original part is no longer available, a suitable replacement will be provided.
- The customer is responsible for shipping costs to send the defective part or parts to Sim Sports Corporation.
- Sim Sports Corporation will cover the cost of shipping repaired or replacement parts back to the customer for approved warranty claims.
All products or parts returned under warranty must be properly packaged, accompanied by proof of purchase, and clearly marked with the RMA number provided by SimBooth.
What the Warranty Covers
Covered under warranty during the applicable term and under normal use:
- Structural failures or defects in aluminum framing.
- Manufacturing defects in panels, turf, flooring, back mesh, and screens.
- Fabrication defects in hitting mats and white projection screens.
- Hardware failures of IDRA II technology purchased as part of a SimBooth kit.
What the Warranty Does Not Cover
- Normal wear from golf ball strikes, club strikes, or long-term use.
- Cosmetic blemishes that do not affect function.
- Damage caused by improper installation, unauthorized alterations, or lack of proper care.
- Damage caused by external events such as flooding, fire, extreme weather, or power surges.
To the extent permitted by law, Sim Sports Corporation is not liable for indirect, incidental, or consequential damages arising from the use or inability to use SimBooth products.
Post-Warranty Service
- If your SimBooth product requires service after the warranty period expires, paid repair or replacement options may be available from Sim Sports Corporation.
- For post-warranty service, the customer is responsible for all parts, labor, and shipping costs.
- If you have questions about whether your SimBooth issue is covered under warranty or need help starting a claim, contact support@simulatordirect.com and we will assist you in coordinating with SimBooth’s support team.

Newsletter
Exclusive Updates. Delivered Before Anyone Else.